概念介绍
传统数据中心面临的问题:
资源使用率低
资源分配不均
自动化能力差
初始化成本高

云计算:
云计算是一种按使用量付费的模式,这种模式提供可用的、便捷的、按需的网络访问, 进入可配置的计算资源共享池(资源包括网络,服务器,存储,应用软件,服务)
这些资源能够被快速提供,只需投入很少的管理工作,或与服务供应商进行很少的交互。

特点:
云计算是什么?:1.一种模式  2.云计算必须通过网络使用 3.弹性计算,按需付费,快速扩展。你不用关心太多,都由云计算厂商提供
按开发模式,分公有云,私有云,混合云,社区云

注意点:
云计算不等于虚拟化
虚拟化是技术
云计算是资源使用交付模式

应用虚拟化:
比如你没安装xshell,但是你可以点这个xshell图标,调用程序,这就是应用虚拟化的作用

互联网中服务器虚拟化应用最多。
半虚拟化的技术,比如IO层面,肯定是半虚拟化的性能好,否则多了一层
另外网络IO也是半虚拟化好

kvm支持超配(虚拟出多个cpu)
xen不支持超配,你买vps的时候,对方说它们是基于xen的。其实意思就是不是属于超配的那种

kvm是一个内核模块
qemu是将网络IO和硬盘IO的虚拟化
kvm学习开始
注意,如果使用自动化安装方式安装的宿主机,需要修改以下部分,不然网桥无法自动创建成功
centos 7.2经过测试,镜像为:CentOS-7-x86_64-1511,其他高版本没有测试,需实验
[root@master /data/tftpboot-7.2/pxelinux.cfg]#cat default
需要删除里面的:net.ifnames=0 biosdevname=0,也就是使用系统默认的网卡名称,而不是自定义的
查看是否支持虚拟化
先查看服务器cpu是否支持kvm虚拟机。如果是vmware虚拟机,需要勾选cpu的虚拟化。
[root@master ~]#lscpu | grep -E '(vmx|svm)'  只要能获取到字符串就表示支持了
安装kvm相关软件包
virt-install  包提供virt-install工具,可以用于创建虚拟机
qemu-kvm  主要的KVM程序包
virt-manager  GUI虚拟机管理工具
libvirt  是可底层kvm内核打交道的接口工具。用户态的所有命令都是调用了它。停止它,kvm运行正常,但是无法管理了
virt-install  基于libvirt服务的虚拟机创建命令
bridge-utils  创建和管理桥接设备的工具(安装上述包会依赖此包。自动安装上)

[root@master ~]#yum -y install qemu-kvm qemu-kvm-tools virt-manager libvirt virt-install

设置libvirtd服务开机启动,同时启动此服务
[root@master ~]#systemctl enable libvirtd.service
[root@master ~]#systemctl start libvirtd.service
[root@master ~]#systemctl status libvirtd.service

启动服务后,可以看到多出一个新的网桥virbr0
[root@master ~]#brctl show
bridge name	bridge id		STP enabled	interfaces
virbr0		8000.525400700e1b	yes		virbr0-nic
创建硬盘
使用qemu-img工具创建硬盘,格式,路径,多大
[root@master ~]#rpm -qf /usr/bin/qemu-img
qemu-img-1.5.3-156.el7_5.3.x86_64

这里有两种格式的硬盘,选择第一种测试,后面会测试转换硬盘格式功能将格式转为第二种方式
或者可以直接使用第二种方式创建硬盘
[root@master ~]#qemu-img create -f raw /data/centos-7.5_1.raw 10G
###[root@master ~]#qemu-img create -f qcow2 /data/centos-7.5_1.qcow2 10G
Formatting '/data/centos-7.5_1.raw', fmt=raw size=10737418240

查看其他子命令以及帮助:qemu-img --help
创建网桥
iface-bridge - create a bridge device and attach an existing network device to it
查看具体的帮助,也可以自己创建网桥,然后将现有网卡桥到网桥上,这个方便些
[root@master ~]#virsh iface-bridge --help

[root@master ~]#virsh iface-bridge eth0 br0 --no-stp
Created bridge br0 with attached device eth0
Bridge interface br0 started

[root@master ~]#ip a

2: eth0: <BROADCAST,MULTICAST,UP,LOWER_UP> mtu 1500 qdisc pfifo_fast master br0 state UP qlen 1000
    link/ether 00:50:56:34:bc:93 brd ff:ff:ff:ff:ff:ff
5: br0: <BROADCAST,MULTICAST,UP,LOWER_UP> mtu 1500 qdisc noqueue state UP
    link/ether 00:50:56:34:bc:93 brd ff:ff:ff:ff:ff:ff
    inet 192.168.170.20/24 brd 192.168.170.255 scope global br0
       valid_lft forever preferred_lft forever
    inet6 fe80::250:56ff:fe34:bc93/64 scope link
       valid_lft forever preferred_lft forever

[root@master ~]#brctl show
bridge name	bridge id		STP enabled	interfaces
br0		8000.00505634bc93	no		eth0
virbr0		8000.525400700e1b	yes		virbr0-nic

如果创建出错,使用下面
[root@master ~]#cat ab.sh ip addr del 192.168.170.20/24 dev eth0
ip addr add 192.168.170.20/24 dev br-ex
brctl addif br-ex eth0
安装第一个kvm虚拟机
下面开始安装虚拟机,下载镜像到/data目录,这里使用centos7.5来测试
https://archive.kernel.org/centos-vault/7.5.1804/isos/x86_64/
wget https://archive.kernel.org/centos-vault/7.5.1804/isos/x86_64/CentOS-7-x86_64-Minimal-1804.iso

virt-install选项
usage: virt-install --name NAME --memory MB STORAGE INSTALL [options]

--virt-type HV_TYPE   Hypervisor name to use (kvm, qemu, xen, ...)
--os-type             系统类型
-n NAME, --name NAME  Name of the guest instance
--memory MEMORY       Configure guest memory allocation. Ex:
                    --memory 1024 (in MiB)
                    --memory 512,maxmemory=1024
                    --memory 512,maxmemory=1024,hotplugmemorymax=2048,hotplugmemoryslots=2
--vcpus VCPUS         Number of vcpus to configure for your guest. Ex:
                    --vcpus 5
                    --vcpus 5,maxcpus=10,cpuset=1-4,6,8
                    --vcpus sockets=2,cores=4,threads=2,

--cdrom CDROM         CD-ROM installation media
--disk DISK           Specify storage with various options. Ex.
                    --disk size=10 (new 10GiB image in default location)
                    --disk /my/existing/disk,cache=none
                    --disk device=cdrom,bus=scsi
                    --disk=?
--network NETWORK
                    Configure a guest network interface. Ex:
                    --network bridge=mybr0
                    --network network=my_libvirt_virtual_net
                    --network network=mynet,model=virtio,mac=00:11...
                    --network none
                    --network help
--graphics GRAPHICS   Configure guest display settings. Ex:
                    --graphics vnc
                    --graphics spice,port=5901,tlsport=5902
                    --graphics none
                    --graphics vnc,password=foobar,port=5910,keymap=ja

--noautoconsole    不要自动尝试连接到客户端控制台
--autostart        主机启动时自动启动域。
--noreboot         安装完成后不启动客户机。

Use '--option=?' or '--option help' to see available suboptions
for example: virt-install --network ?


创建虚拟机,命令如下
virt-install命令可以创建虚拟机,是rpm包python-virtinst里的一个工具,其实是个python脚本 ,可以利用该工具在终端下创建KVM guest主机
关于virt-install在centos6里面virt-manager里面带的,在centos7是需要单独安装virt-install安装

[root@master ~]#virt-install --virt-type kvm \
--os-type=linux --name centos-7.5_1 \
--memory 1024 --vcpus 2 --network bridge=br0 \
--cdrom /data/CentOS-7-x86_64-Minimal-1804.iso \
--graphics vnc,listen=0.0.0.0,port=5901 \
--disk /data/centos-7.5_1.raw --noautoconsole

Starting install...
Domain installation still in progress. You can reconnect to
the console to complete the installation process.


[root@master /data]#ss -tnlp | grep qemu
LISTEN     0      1            *:5901                     *:*                   users:(("qemu-kvm",pid=31639,fd=18))


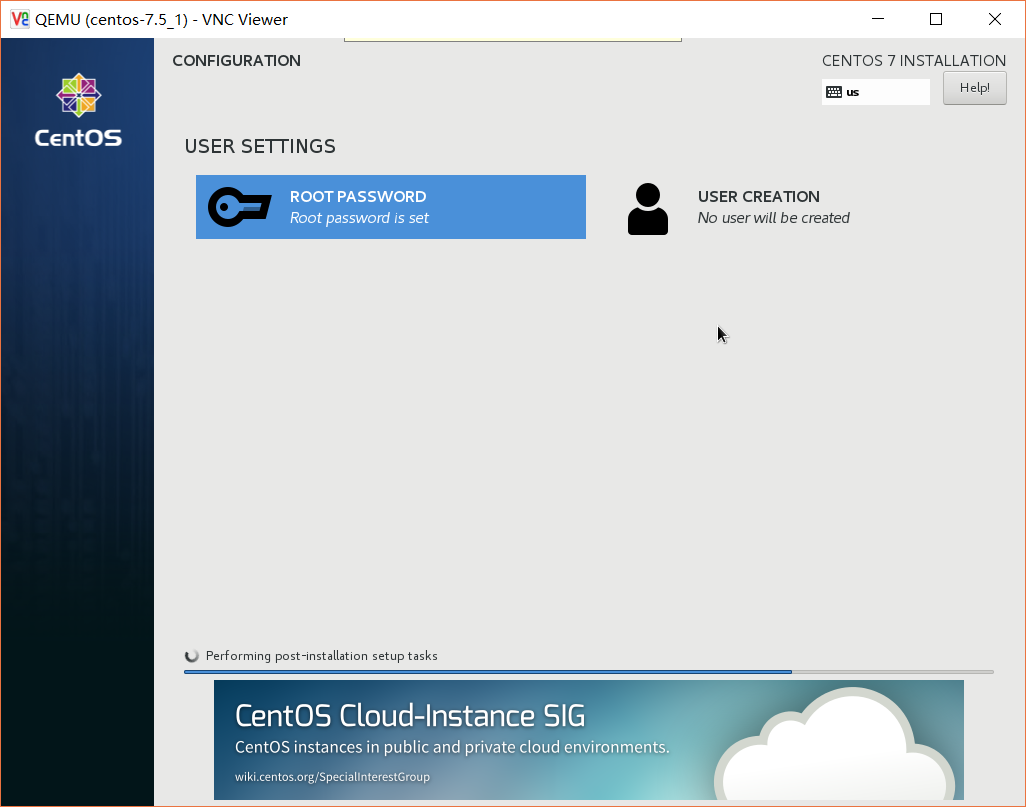
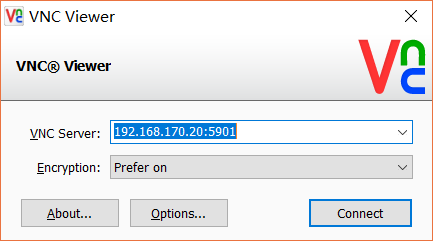
VNC软件,用于VNC(Virtual Network Computing),为一种使用RFB协议的显示屏画面分享及远程操作软件。此软件借由网络,可发送键盘与鼠标的动作及即时的显示屏画面。
通过vnc软件连接进行配置:192.168.170.20:5901

–

虚拟机操作
安装完成后界面点击重启,重启后此虚拟机会关闭,需要手动重新启动下

[root@master ~]#virsh list
 Id    Name                           State
----------------------------------------------------

[root@master ~]#virsh list --all
 Id    Name                           State
----------------------------------------------------
 -     centos-7.5_1                       shut off

[root@master ~]#virsh start centos-7.5_1
Domain centos-7.5_1  started

[root@master ~]#virsh list
 Id    Name                           State
----------------------------------------------------
 2     centos-7.5_1                       running


[root@master ~]#brctl show
bridge name bridge id       STP enabled interfaces
br0     8000.00505634bc93   no      eth0
                            vnet0


通过vnc连接,给虚拟机配置ip地址
IPADDR=192.168.170.40
NETMASK=255.255.255.0
GATEWAY=192.168.170.2
DNS1=8.8.8.8

重启网络后就可以ping通qq.com了
虚拟机的常用操作
virsh命令使用
    virsh help KEYWORD  查看某个命令帮助
    list 查看所有虚拟主机
    list --all  查看宿主机上所有虚拟机(无论处于什么状态,关机,挂起等)
    start 启动
    shutdown 关闭域
    reboot  重启域
    destroy 关闭域(拔电源)

    suspend  暂停域
    resume  恢复域

    create  创建并启动域
    dumpxml  导出指定域的xml格式的配置文件
    define  创建域
    undefine  删除域


    管理域的资源
    setmem  改域的内存大小,不能超出内存最大值
    setmaxmem  设置内存最大值
    setvcpus  修改核心数
    vcpuinfo  查看域cpu数量

    domrename  对虚拟机进行重命名
    domrename old new  对虚拟机进行重命名,需关机
    autostart 虚拟机开机启动
    autostart --disable 取消虚拟机开机启动

    domid  获取域id
    domuuid  获取域uuid
    dominfo  域信息
    vncdisplay  获取vnc端口

    save  保存状态到某个文件中,内存文件保存到文件
    restore  从保存文件恢复域状态

    domblkstat  块统计信息

    domblklist  查看域的磁盘信息
    使用下面的命令创建新的磁盘文件
    qemu-img create -f qcow2 -o ? /tmp/test.qcow2  查看选项有哪些,不会实际创建
    qemu-img create -f qcow2 -o preallocation=metadata /tmp/test.qcow2 120G  稀疏格式文件,用多少实际占用多少
    还支持resize选项来调整大小

    attach-disk  将上面创建的磁盘热插到虚拟机里面
        virsh attach-disk xxx /tmp/test.qcow2 vdb
        virsh domblklist xxx
    detach-disk

    domiflist  查看域的所有网卡信息
    attach-interface
        virsh attach-interface <domain> <type> <source>
            type: bridge
            source: br0  往虚拟机添加一个网卡,网卡为桥接模式,桥接到br0桥上面
        virsh detach-interface <domain> <type> --mac MAC
下面是具体的测试说明
在宿主机上查看,创建完kvm,下面路径多了一个xml的文件,是虚拟机的配置文件
[root@master /etc/libvirt/qemu]#ll
total 8
-rw------- 1 root root 3917 Jul 22 21:11 centos-7.5_1.xml
drwx------ 3 root root 4096 Jul 22 20:59 networks

查看配置文件,这里使用专门的命令查看配置文件,会检查一些错误:
[root@master /etc/libvirt/qemu]#virsh edit centos-7.5_1
它定义了虚拟机的软件和硬件信息,这里是最大内存和当前内存,以及cpu数量
<memory unit='KiB'>1048576</memory>
<currentMemory unit='KiB'>1048576</currentMemory>
<vcpu placement='static'>2</vcpu>

这里找出一些重要的说下,vnc监听在5901端口上
<graphics type='vnc' port='5901' autoport='no' listen='0.0.0.0'>

下面是硬盘路径和格式
<disk type='file' device='disk'>
<driver name='qemu' type='raw'/>
<source file='/data/centos-7.5_1.raw'/>

文件开头提示,你如果想编辑虚拟机配置,需要使用下面命令,不要直接修改这个文件
WARNING: THIS IS AN AUTO-GENERATED FILE. CHANGES TO IT ARE LIKELY TO BE
OVERWRITTEN AND LOST. Changes to this xml configuration should be made using:
  virsh edit centos-7.5_1


dumpxml参数,如果你某天把这个虚拟机删除了,通过xml文件还可以把它起来,当然虚拟机的硬盘需要还在,不然里面的文件就丢了
这个参数可以导出xml文件
你要是物理删除虚拟机,那就无法恢复了,这个xml文件类似一个静态的saltstack描述文件
[root@master ~]#virsh dumpxml centos-7.5_1 > /data/centos-7.5_1.xml
[root@master ~]#ll /data/centos-7.5_1.xml
-rw-r--r-- 1 root root 4915 Jul 22 21:42 /data/centos-7.5_1.xml


删除虚拟机
删除虚拟机的参数可以使用undefine,它是彻底删除的意思,如果没有备份xml配置文件,那么虚拟机无法恢复了,/etc/libvirt/qemu下的配置文件会被删除,但是磁盘不会删除

[root@master ~]#virsh list --all
 Id    Name                           State
----------------------------------------------------
 5     centos-7.5_1                   running

[root@master ~]#virsh shutdown centos-7.5_1
Domain centos-7.5_1 is being shutdown

[root@master ~]#virsh undefine centos-7.5_1
Domain centos-7.5_1 has been undefined

[root@master ~]#virsh list --all
 Id    Name                           State
----------------------------------------------------

[root@master ~]#ll /etc/libvirt/qemu
total 4
drwx------ 3 root root 4096 Jul 22 20:59 networks

[root@master ~]#ll /data/
total 2592072
-rw-r--r-- 1 root root 10737418240 Jul 22 21:43 centos-7.5_1.raw
-rw-r--r-- 1 root root        4915 Jul 22 21:42 centos-7.5_1.xml
-rw-r--r-- 1 qemu qemu   950009856 Jul 22 17:15 CentOS-7-x86_64-Minimal-1804.iso


从备份的配置文件恢复虚拟机,可以正常启动,需要硬盘文件
[root@master ~]#virsh define /data/centos-7.5_1.xml
Domain centos-7.5_1 defined from /data/centos-7.5_1.xml

[root@master ~]#ll /etc/libvirt/qemu/
total 12
-rw------- 1 root root 4255 Jul 22 21:45 centos-7.5_1.xml
drwx------ 3 root root 4096 Jul 22 20:59 networks

[root@master ~]#virsh list --all
 Id    Name                           State
----------------------------------------------------
 -     centos-7.5_1                   shut off

[root@master ~]#virsh start centos-7.5_1
Domain centos-7.5_1 started

[root@master ~]#virsh list --all
 Id    Name                           State
----------------------------------------------------
 6     centos-7.5_1                   running


查询虚拟机vnc端口
[root@master ~]#virsh vncdisplay centos-7.5_1
:1


开机自启动设置
[root@master ~]#virsh autostart centos-7.5_1
Domain centos-7.5_1 marked as autostarted
# 实质为创建软连接
[root@master ~]#ll /etc/libvirt/qemu/autostart/
total 0
lrwxrwxrwx 1 root root 34 Sep 15 21:22 centos-7.5_1.xml -> /etc/libvirt/qemu/centos-7.5_1.xml
kvm虚拟机console登录
新安装一台虚拟机后,是无法通过virsh console 命令连入虚拟机中的,这时我们需要开启虚拟机的console功能。
注:退出virsh console连接的方法,使用组合键Ctrl+]即可

CentOS 7.X 版本console登录,在虚拟机内操作(该操作仅限centos7):
[root@localhost ~]# grubby --update-kernel=ALL --args="console=ttyS0,115200n8"
[root@localhost ~]# reboot


重启完成后,使用virsh console 连接虚拟机。
[root@master ~]#virsh console 5
Connected to domain centos-7.5_1
Escape character is ^]

CentOS Linux 7 (Core)
Kernel 3.10.0-862.el7.x86_64 on an x86_64

localhost login: root
Password:
[root@localhost ~]#


CentOS 6.X 版本console登录,在虚拟机内操作(该操作仅限centos6):
添加ttyS0的许可,允许root登陆
[root@clsn6 ~]# echo "ttyS0" >> /etc/securetty

编辑/etc/grub.conf中加入console=ttyS0
在该文件的第16行。kernel选项后添加

[root@clsn6 ~]# sed -i '/\tkernel/s#.*#& console=ttyS0#g' /etc/grub.conf
[root@clsn6 ~]# sync  # 同步配置到 /boot/grub/grub.conf

编辑/etc/inittab,在最后一行加入内容
[root@clsn6 ~]# echo 'S0:12345:respawn:/sbin/agetty ttyS0 115200' >>/etc/inittab

以上操作都完成后,重启虚拟机
[root@clsn6 ~]# reboot
CPU和内存动态扩容部分
1、安装的时候,就可以设置cpu大小和内存大小,最大内存和最大cpu,当前内存和当前cpu
[root@master ~]#virt-install --help | grep cpu
  --vcpus VCPUS         Number of vcpus to configure for your guest. Ex:
                        --vcpus 5
                        --vcpus 5,maxcpus=10,cpuset=1-4,6,8
                        --vcpus sockets=2,cores=4,threads=2,
  --cpu CPU             CPU model and features. Ex:
                        --cpu coreduo,+x2apic
                        --cpu host-passthrough
                        --cpu host
[root@master ~]#virt-install --help | grep memory
usage: virt-install --name NAME --memory MB STORAGE INSTALL [options]
  --memory MEMORY       Configure guest memory allocation. Ex:
                        --memory 1024 (in MiB)
                        --memory 512,maxmemory=1024
                        --memory 512,maxmemory=1024,hotplugmemorymax=2048,hotplugmemoryslots=2
  --memdev MEMDEV       Configure a guest memory device. Ex:
  --memtune MEMTUNE     Tune memory policy for the domain process.
  --memorybacking MEMORYBACKING
                        Set memory backing policy for the domain process. Ex:
                        --memorybacking hugepages=on


2、要支持动态修改cpu数量,需要将静态cpu数配置修改为动态配置,具体如下,修改完成后,重启虚拟机生效

[root@master ~]#virsh edit centos-7.5_1

  1 <domain type='kvm'>
  2   <name>centos-7.5_1</name>
  3   <uuid>99a501ec-08d9-4217-b82d-07438890cee2</uuid>
  4   <memory unit='KiB'>1048576</memory>
  5   <currentMemory unit='KiB'>1048576</currentMemory>
  6   <vcpu placement='auto'>2</vcpu>    #####修改这里


3、动态修改cpu

动态修改cpu
查看cpu操作相关的参数,其中有一个setvcpus,动态修改cpu只有在CentOS7支持,CentOS6不支持
另外动态修改CPU,只能动态的添加,不能动态的减少,如果要减少可以通过关闭kvm,修改配置文件操作,动态修改cpu数量重启失效
[root@master ~]#virsh setvcpus centos-7.5_1 2 --live

可以通过下面方式不登录kvm虚拟机查看cpu个数
[root@master ~]#virsh dominfo centos-7.5_1
Id:             3
Name:           centos-7.5_1
UUID:           99a501ec-08d9-4217-b82d-07438890cee2
OS Type:        hvm
State:          running
CPU(s):         2


4、动态修改内存
修改内存不能超过最大内存,如果要设置最大内存,只能修改配置文件来实现,要想生效,必须要重启虚拟机
在规划的时候就应该考虑要热添加,当时装虚拟机的时候,就要考虑这个问题,应该设置虚拟机的最大内存和cpu为宿主机的内存,这样,就能随意动态调整虚拟机内存和cpu
关于硬盘扩容部分,虽然可以resize增大,但是有丢失数据的风险,生产中不推荐使用

下面是配置文件
  <memory unit='KiB'>16777216</memory>  最大内存大小,单位:kB
  <currentMemory unit='KiB'>4777216</currentMemory>  当前启动的内存大小,不能超过上面的,单位:kB


根据上面的说明
[root@master ~]#virsh setmem centos-7.5_1 2g  动态修改内存,立即生效,不能超过配置中最大值
[root@master ~]#virsh setmem centos-7.5_1 2g --config 修改配置中内存设置,下次重启生效,不能超过配置中最大值
[root@master ~]#virsh dominfo centos-7.5_1
Id:             3
Name:           centos-7.5_1
UUID:           99a501ec-08d9-4217-b82d-07438890cee2
OS Type:        hvm
State:          running
CPU(s):         2
CPU time:       49.0s
Max memory:     1048576 KiB
Used memory:    204800 KiB
动态增加磁盘
几种磁盘格式比较

1. raw
raw格式是最简单,什么都没有,所以叫raw格式。连头文件都没有,就是一个直接给虚拟机进行读写的文件。raw不支持动态增长空间,必须一开始就指定空间大小。
所以相当的耗费磁盘空间。但是对于支持稀疏文件的文件系统(如ext4)而言,这方面并不突出。ext4下默认创建的文件就是稀疏文件,所以不要做什么额外的工作。用
du -sh 文件名
可以查看文件的实际大小。也就是说,不管磁盘空间有多大,运行下面的指令没有任何问题:
qemu-img create -f raw test.img 10000G
raw镜像格式是虚拟机种I/O性能最好的一种格式,大家在使用时都会和raw进行参照,性能越接近raw的越好。但是raw没有任何其他功能。对于稀疏文件的出现,像qcow
这一类的运行时分配空间的镜像就没有任何优势了。

2. qcow2
qcow2是集各种技术为一体的超级镜像格式,支持内部快照,加密,压缩等一系列功能,访问性能也在不断提高。但qcow2的问题就是过于臃肿,把什么功能都集于一身。
镜像小的原因是镜像文件只保存改变的部分,原来的文件被锁住了。
qcow2格式,类似虚拟机的瘦模式,虽然划分10GB,但是不是立即占完的,用多少占多少

另外
假如你有几百GB的数据,不建议放在kvm里面,
IO慢,kvm迁移也麻烦


动态添加硬盘
[root@master /data]#qemu-img create -f qcow2 centos-7.5_2.qcow2 5G
Formatting 'centos-7.5_2.qcow2', fmt=qcow2 size=5368709120 encryption=off cluster_size=65536 lazy_refcounts=off


[root@master /data]#qemu-img info centos-7.5_2.qcow2
image: centos-7.5_2.qcow2
file format: qcow2
virtual size: 5.0G (5368709120 bytes)
disk size: 196K
cluster_size: 65536
Format specific information:
    compat: 1.1
    lazy refcounts: false


[root@master /data]#virsh list --all
 Id    Name                           State
----------------------------------------------------
 5     centos-7.5_1                   running

[root@master /data]#virsh attach-disk centos-7.5_1 /data/centos-7.5_2.qcow2 vdb --live --config --cache=none --subdriver=qcow2
Disk attached successfully

参数说明:
vdb  第二块硬盘
--live  热添加,影响当前域
--config  影响下次域,即下次虚机重启的时候自动添加,其实修改的是xml配置文件,增加了一个disk段
--subdriver  驱动类型

将磁盘添加到虚机的开机启动中
注意:挂载磁盘要放到开机启动rc.local文件里面,不能放到fstab里面,不然会出错,导致虚机启动不起来

将已挂载的磁盘卸载下来
[root@master /data]#virsh detach-disk centos-7.5_1  vdb

然后在kvm上操作
[root@master /data]#fdisk /dev/vdb
[root@master /data]#mke2fs -t ext4 /dev/vdb1

遇到的问题
虚机挂载另外一块盘svdb,并写到了fstab里面。重启服务器的时候,ip添加不上,后来发现把fstab里面svdb注释掉,就可以正常启动了。可以将挂载放到/etc/rc.local里面,而不是放到/etc/fstab里面
机器启动后,执行lsblk命令,svdb1分区没有,只有svdb盘,里面还有数据。后来把svdb盘卸载下来,重新挂载,vsdb1分区可以正常显示了
上面内容需再测试
参考文档
https://www.cnblogs.com/nmap/p/6369180.html
http://www.cnblogs.com/clsn/p/8366251.html
–
 江哥架构师笔记
评论前必须登录!
注册