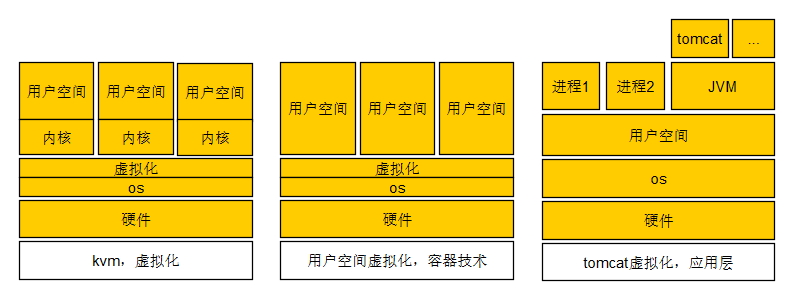
当当当,先来张图片

docker介绍
普通的虚拟化技术,完全虚拟化,每个虚拟机都是独立的操作系统,都有自己的内核空间,用户空间,隔离是做的最好的,但是需要层层调用,系统浪费也很严重
几种虚拟化技术区别:

文件:![]() 虚拟化.zip
虚拟化.zip
docker的技术必须是在Linux 3.10内核以上才可以,如果是低版本的内核,可以运行,但是机制不完整,不稳定,比如user namespace是3.8才有的,之前的内核版本就会有缺陷,下面是具备所需条件的最低版本
NameSpace:内核级别,内核隔离
PID NameSpace: Linux 2.6.24,pid隔离
Network NameSpace: Linux 2.6.29,网络设备,网络栈,端口等网络隔离
User NameSpace: Linux 3.8,用户和用户组资源隔离
IPC NameSpace: Linux 2.6.19,信号量,消息队列和共享内存,进程间通信资源隔离
UTS NameSpace: Linux 2.6.19,主机名和域名隔离
Mount NameSpace: Linux 2.4.19,挂载点隔离(文件系统隔离)
一个用户空间有可能将内核资源耗尽,其他用户空间没有办法使用内核,另一种控制机制
CGroup: Linux Control Group,控制组,Linux 2.6.24
	内核级别:限制,控制一个进程组使用的资源,假如有8个核心,设定只能使用两个核心
	限制资源:CPU,内存,IO

	功能:Resource Limitation,资源限制
		Proritization,优先级控制
		Accouting,审计和统计,主要为计费
		Control:挂起进程,恢复进程
	可以看到的方面,在centos7上面

[root@localhost /sys/fs/cgroup]#ll
total 0
drwxr-xr-x 4 root root  0 Apr  3 18:28 blkio
lrwxrwxrwx 1 root root 11 Apr  3 14:55 cpu -> cpu,cpuacct
lrwxrwxrwx 1 root root 11 Apr  3 14:55 cpuacct -> cpu,cpuacct
drwxr-xr-x 5 root root  0 Apr  3 14:55 cpu,cpuacct
drwxr-xr-x 3 root root  0 Apr  3 14:55 cpuset
drwxr-xr-x 4 root root  0 Apr  3 18:28 devices
drwxr-xr-x 3 root root  0 Apr  3 14:55 freezer
drwxr-xr-x 3 root root  0 Apr  3 14:55 hugetlb
drwxr-xr-x 4 root root  0 Apr  3 18:28 memory
drwxr-xr-x 3 root root  0 Apr  3 14:55 net_cls
drwxr-xr-x 3 root root  0 Apr  3 14:55 perf_event
drwxr-xr-x 5 root root  0 Apr  3 14:55 systemd

#mount    #这两个命令也可以看到
#lssubsys -m
Cgroup的子系统:
blkio:		设定块设备的IO限制
cpu:		限制cpu
cpuacct:	报告cgroup中所使用的cpu资源
cpuset:	为cgroup中的任务分配cpu和内存资源
memory:	设定内存的使用限制
devices:	控制cgroup中任务对设备的访问
freezer:	挂起进程,恢复进程任务
net_cls:	(classid)使用等级级别标识符来标示网络数据包,实现基于tc完成对不同cgroup中产生的流量控制
perf_event:	使用后使cgroup中的任务可以统一进行性能测试
hugetlb:	对hugetlb系统进行限制,
Cgroup中的术语:
task(任务):进程或线程
Cgroup:一个独立的资源控制单位
subsystem:子系统
hlerarchy:层级
AUFS:
unionFS,把不同的物理位置的目录合并到同一个目录中
docker强依赖aufs,但是centos内核不带aufs,
Device mapper:
linux 2.6内核引入的最重要的技术之一,用于在内核中支持逻辑卷管理的通用设备映射机制
Mapped Device
Mapping Table
Target Device
Docker:
出现在2013
使用go语言
遵循:apache2.0
域名:docker.com
C/S:
Docker Client:发起docker相关的请求,类似于mysql的客户端
Docker Server:容器运行的节点
核心组件:
docker client:
docker deamon:运行于宿主机,docker的守护进程,用户可通过docker client与其进行交互
image:镜像,只读文件,用来创建container,一个镜像可以运行多个container,镜像文件通过dockerfile文件创建,也可以通过docker hub下载
repository:仓库
    公共仓库:base images,docker hub/registry
    私有仓库:docker registry
docker container:docker的运行组件,实例,容器是一个隔离环境;

另外两个重要的组件:
    docker link:网络,通信
    docker volume:实现持久化存储
docker安装方式
安装方式:
centos6:配置epel源安装
centos7:配置extra源安装:名字:docker
    配置官方的yum源:名字:docker-ce
当当当,开始docker,不推荐使用extras和epel源中的docker,版本陈旧,不是docker官方维护的
1、下面的镜像是官方的,如果想要稳定的,只用设置stable就可以
cd /etc/yum.repos.d
wget https://download.docker.com/linux/centos/docker-ce.repo

[root@localhost /etc/yum.repos.d]#cat docker-ce.repo
[docker-ce-stable]
name=Docker CE Stable - $basearch
baseurl=https://download.docker.com/linux/centos/7/$basearch/stable
enabled=1
gpgcheck=1
gpgkey=https://download.docker.com/linux/centos/gpg

[docker-ce-edge]
name=Docker CE Edge - $basearch
baseurl=https://download.docker.com/linux/centos/7/$basearch/edge
enabled=1
gpgcheck=1
gpgkey=https://download.docker.com/linux/centos/gpg
下面的清华大学源也可以,是镜像源,同一文件,速度快点
[docker-ce-stable]
name=Docker CE Stable - $basearch
baseurl=https://mirrors.tuna.tsinghua.edu.cn/docker-ce/linux/centos/7/$basearch/stable
enabled=1
gpgcheck=1
gpgkey=https://mirrors.tuna.tsinghua.edu.cn/docker-ce/linux/centos/gpg

[docker-ce-edge]
name=Docker CE Edge - $basearch
baseurl=https://mirrors.tuna.tsinghua.edu.cn/docker-ce/linux/centos/7/$basearch/edge
enabled=1
gpgcheck=1
gpgkey=https://mirrors.tuna.tsinghua.edu.cn/docker-ce/linux/centos/gpg
安装
[root@localhost ~]#yum info docker-ce
Loaded plugins: fastestmirror
Loading mirror speeds from cached hostfile
Available Packages
Name        : docker-ce
Arch        : x86_64
Version     : 17.06.1.ce
Release     : 1.el7.centos
Size        : 21 M
Repo        : docker-ce-edge
Summary     : The open-source application container engine
URL         : https://www.docker.com
License     : ASL 2.0
Description : Docker is an open source project to build, ship and run any application as a
            : lightweight container.
            :
            : Docker containers are both hardware-agnostic and platform-agnostic. This means
            : they can run anywhere, from your laptop to the largest EC2 compute instance and
            : everything in between - and they don't require you to use a particular
            : language, framework or packaging system. That makes them great building blocks
            : for deploying and scaling web apps, databases, and backend services without
            : depending on a particular stack or provider.

安装
yum install -y docker-ce

当安装的时候提示,
Error: Package: docker-ce-17.06.1.ce-1.el7.centos.x86_64 (docker-ce-edge)
           Requires: container-selinux >= 2.9

需要将centos的extras源添加进来,有里面依赖的包
[extras]
name=CentOS-$releasever-$basearch-extras-mirrors.aliyun.com
baseurl=http://mirrors.aliyun.com/centos/$releasever/extras/$basearch/
enabled=1
gpgcheck=1
gpgkey=https://mirrors.aliyun.com/centos/RPM-GPG-KEY-CentOS-7
包含的文件内容
[root@localhost ~]#rpm -ql docker-ce
/etc/udev/rules.d/80-docker.rules
/usr/bin/docker
/usr/bin/docker-containerd
/usr/bin/docker-containerd-ctr
/usr/bin/docker-containerd-shim
/usr/bin/docker-init
/usr/bin/docker-proxy
/usr/bin/docker-runc
/usr/bin/dockerd
/usr/lib/systemd/system/docker.service
启动服务,可以这样理解,这个docker服务类似于windows上的VMware软件,现在将这个软件启动起来,docker在这里的作用类似于VMware,是一个虚拟化工具,在这个工具上面可以跑好多的系统。
[root@localhost ~]#systemctl is-enabled docker
disabled
[root@localhost ~]#systemctl enable docker
Created symlink from /etc/systemd/system/multi-user.target.wants/docker.service to /usr/lib/systemd/system/docker.service.
[root@localhost ~]#systemctl is-enabled docker
enabled
[root@localhost ~]#systemctl start docker.service
添加加速器,因国外镜像网站访问很慢,这里添加加速器,具体看下面的参考文档
cp -n /lib/systemd/system/docker.service /etc/systemd/system/docker.service
sed -i "s|ExecStart=/usr/bin/docker daemon|ExecStart=/usr/bin/docker daemon --registry-mirror=https://dp3mgmkf.mirror.aliyuncs.com|g" /etc/systemd/system/docker.service
sed -i "s|ExecStart=/usr/bin/dockerd|ExecStart=/usr/bin/dockerd --registry-mirror=https://dp3mgmkf.mirror.aliyuncs.com|g" /etc/systemd/system/docker.service
systemctl daemon-reload
systemctl restart docker
docker相关的命令:
[root@master ~]#docker -h
Flag shorthand -h has been deprecated, please use --help

Usage:	docker COMMAND

A self-sufficient runtime for containers

Options:
      --config string      Location of client config files (default "/root/.docker")
  -D, --debug              Enable debug mode
  -H, --host list          Daemon socket(s) to connect to
  -l, --log-level string   Set the logging level ("debug"|"info"|"warn"|"error"|"fatal") (default "info")
      --tls                Use TLS; implied by --tlsverify
      --tlscacert string   Trust certs signed only by this CA (default "/root/.docker/ca.pem")
      --tlscert string     Path to TLS certificate file (default "/root/.docker/cert.pem")
      --tlskey string      Path to TLS key file (default "/root/.docker/key.pem")
      --tlsverify          Use TLS and verify the remote
  -v, --version            Print version information and quit

Management Commands:
  config      Manage Docker configs
  container   Manage containers
  image       Manage images
  network     Manage networks
  node        Manage Swarm nodes
  plugin      Manage plugins
  secret      Manage Docker secrets
  service     Manage services
  stack       Manage Docker stacks
  swarm       Manage Swarm
  system      Manage Docker
  trust       Manage trust on Docker images (experimental)
  volume      Manage volumes

Commands:
  attach      Attach local standard input, output, and error streams to a running container
  build       Build an image from a Dockerfile
  commit      Create a new image from a container's changes
  cp          Copy files/folders between a container and the local filesystem
  create      Create a new container
  diff        Inspect changes to files or directories on a container's filesystem
  events      Get real time events from the server
  exec        Run a command in a running container
  export      Export a container's filesystem as a tar archive
  history     Show the history of an image
  images      List images
  import      Import the contents from a tarball to create a filesystem image
  info        Display system-wide information
  inspect     Return low-level information on Docker objects
  kill        Kill one or more running containers
  load        Load an image from a tar archive or STDIN
  login       Log in to a Docker registry
  logout      Log out from a Docker registry
  logs        Fetch the logs of a container
  pause       Pause all processes within one or more containers
  port        List port mappings or a specific mapping for the container
  ps          List containers
  pull        Pull an image or a repository from a registry
  push        Push an image or a repository to a registry
  rename      Rename a container
  restart     Restart one or more containers
  rm          Remove one or more containers
  rmi         Remove one or more images
  run         Run a command in a new container
  save        Save one or more images to a tar archive (streamed to STDOUT by default)
  search      Search the Docker Hub for images
  start       Start one or more stopped containers
  stats       Display a live stream of container(s) resource usage statistics
  stop        Stop one or more running containers
  tag         Create a tag TARGET_IMAGE that refers to SOURCE_IMAGE
  top         Display the running processes of a container
  unpause     Unpause all processes within one or more containers
  update      Update configuration of one or more containers
  version     Show the Docker version information
  wait        Block until one or more containers stop, then print their exit codes
查看docker里面有哪些镜像文件,可以这样理解,VMware里面要运行centos系统,首先要有光盘镜像文件来安装系统,这里的意思类似,要运行docker容器,要先有images,因为是刚装好,没有镜像文件,可以去公共的hub上面下载,
[root@localhost ~]#docker images
REPOSITORY          TAG                 IMAGE ID            CREATED             SIZE
寻找下载镜像文件,这里列出来的是官方的镜像和其他用户的镜像,官方的镜像比较安全,可靠,还有其他用户公开的镜像
格式:用户名/镜像名字 描述 点赞数 是否官方
[root@localhost ~]#docker search busybox	#比较小的一个镜像
NAME                            DESCRIPTION                           STARS     OFFICIAL
busybox                         Busybox base image.       971       [OK]         #这里下载这个官方的镜像,
progrium/busybox                                                                65
radial/busyboxplus              Full-chain, Internet enabled, busybox made...   12
container4armhf/armhf-busybox   Automated build of Busybox for armhf devic...   6
odise/busybox-python                                                            4
[root@localhost ~]#docker pull busybox	#拉取镜像文件
Using default tag: latest
latest: Pulling from library/busybox
Digest: sha256:32f093055929dbc23dec4d03e09dfe971f5973a9ca5cf059cbfb644c206aa83f
Status: Image is up to date for busybox:latest
[root@localhost ~]#docker images
REPOSITORY          TAG                 IMAGE ID            CREATED             SIZE
busybox             latest              00f017a8c2a6        3 weeks ago         1.11 MB
拉取centos的镜像
[root@localhost ~]#docker search centos
[root@localhost ~]#docker pull centos
Using default tag: latest
latest: Pulling from library/centos
785fe1d06b2d: Pull complete
Digest: sha256:be5b4a93f116a57ab3fd454ada72421eac892a3a4925627ac9a44f65fcd69cf8
Status: Downloaded newer image for centos:latest

[root@localhost ~]#docker images     #显示下载的镜像资源,镜像资源是靠:镜像名和tag来区分不同的镜像的,同一个镜像根据修改的不同可能有不同的标签,标签页很重要
REPOSITORY          TAG                 IMAGE ID            CREATED             SIZE
centos              latest              98d35105a391        2 weeks ago         192.5 MB
busybox             latest              00f017a8c2a6        3 weeks ago         1.11 MB
上面的是共有的,也可以自己在docker上面创建私有仓库,然后从私有仓库中来取镜像资源,如下面
[root@localhost ~]#docker pull hub.andblog.cn:5000/busybox #去指定的私有仓库拉取镜像文件,格式:网站:端口/资源名
运行docker实例,就是说将光盘里面的系统文件启动起来,成为一个操作系统,指明docker images的名字和标签,进入镜像的shell里面,选项-it,交互模式,有一个终端
[root@localhost ~]#docker run -it busybox:latest /bin/sh	#运行busybox实例,下面是这个系统的shell,和普通的操作系统基本是一样的
/ # ls
bin   dev   etc   home  proc  root  sys   tmp   usr   var

[root@localhost ~]#docker run --help    #查看docker run的帮助文件,里面有很多的运行参数选项,
-i, --interactive               Keep STDIN open even if not attached
--rm                            Automatically remove the container when it exits
-t, --tty                       Allocate a pseudo-TTY
打开另外一个xshell终端就可以看到正在运行的docker容器进程,注意这里的container id,很多地方要靠这个id来区分不同的容器
[root@localhost ~]#docker ps	#在另一个终端可以看到详细的信息,
CONTAINER ID        IMAGE               COMMAND      CREATED          STATUS         PORTS         NAMES
8bfdba69fce3        busybox:latest      "/bin/sh"           About a minute ago   Up About a minute     stupefied_boyd
docker实例运行结束后,如果container被清除掉后,所有自己设置的配置文件都会被清除,这里需要设置来保存自己的配置文件
[root@localhost ~]#docker help commit
Usage:	docker commit [OPTIONS] CONTAINER [REPOSITORY[:TAG]]
docker version:显示各个版本信息
[root@localhost ~]#docker version
Client:
 Version:      1.10.0
 API version:  1.22
 Go version:   go1.5.3
 Git commit:   590d5108
 Built:        Thu Feb  4 18:34:50 2016
 OS/Arch:      linux/amd64

Server:
 Version:      1.10.0
 API version:  1.22
 Go version:   go1.5.3
 Git commit:   590d5108
 Built:        Thu Feb  4 18:34:50 2016
 OS/Arch:      linux/amd64
docker info:查看docker运行的各个状态
[root@localhost ~]#docker info
Containers: 1
 Running: 0
 Paused: 0
 Stopped: 1
Images: 2
Server Version: 1.10.0
...
示例-
启动centos的docker container,里面的hostname就是这个container的id号
[root@localhost ~]#docker run -it centos:latest /bin/bash
[root@67a9a2ca06a0 /]#
[root@67a9a2ca06a0 /]# hostname
67a9a2ca06a0
[root@67a9a2ca06a0 /]# ls
anaconda-post.log  dev  home  lib64       media  opt   root  sbin  sys  usr
bin                etc  lib   lost+found  mnt    proc  run   srv   tmp  var
[root@67a9a2ca06a0 /]# cd /etc/
在另一个终端查看
[root@localhost ~]#docker ps
CONTAINER ID        IMAGE               COMMAND             CREATED             STATUS              PORTS               NAMES
67a9a2ca06a0        centos:latest       "/bin/bash"         54 seconds ago      Up 53 seconds                           modest_engelbart
将这个container关闭,关闭后前面的docker终端就会关闭,这个关闭不是移除,而是类似于虚拟机的关机的意思,container还在
[root@localhost ~]#docker kill 67a9a2ca06a0
67a9a2ca06a0
显示所有的container,包括已经关闭的,-a选项,显示所有的
[root@localhost ~]#docker ps -a
CONTAINER ID        IMAGE               COMMAND             CREATED             STATUS                            PORTS               NAMES
67a9a2ca06a0        centos:latest       "/bin/bash"         5 minutes ago       Exited (137) About a minute ago                       modest_engelbart
8bfdba69fce3        busybox:latest      "/bin/sh"           4 hours ago         Exited (0) 4 hours ago                                stupefied_boyd
将已经关闭的container移除,这里的移除的意思就是删除,删除了以后,container里面所有用户的设置都会丢失,类似于将虚拟机删除的意思。虚拟机删除后,镜像文件还在,需要虚拟机的时候可以从镜像文件再创建
[root@localhost ~]#docker rm 67a9a2ca06a0
67a9a2ca06a0
[root@localhost ~]#docker ps -a
CONTAINER ID        IMAGE               COMMAND             CREATED             STATUS                   PORTS               NAMES
8bfdba69fce3        busybox:latest      "/bin/sh"           4 hours ago         Exited (0) 4 hours ago                       stupefied_boyd
一般情况下,docker都是什么时候用,什么时候创建,使用完后就可以立即移除了,这里如果想要kill container的时候就执行remove操作,需要在运行container的时候加上-rm选项,表示推出的时候就删除镜像文件
[root@localhost ~]#docker run -it --rm centos:latest /bin/bash
[root@592a0ff47733 /]#
[root@592a0ff47733 /]#
[root@localhost ~]#docker ps -a
CONTAINER ID        IMAGE               COMMAND             CREATED             STATUS                   PORTS               NAMES
592a0ff47733        centos:latest       "/bin/bash"         2 minutes ago       Up 2 minutes                                 pedantic_roentgen
8bfdba69fce3        busybox:latest      "/bin/sh"           4 hours ago         Exited (0) 4 hours ago                       stupefied_boyd
[root@localhost ~]#docker kill 592a0ff47733
592a0ff47733
[root@localhost ~]#docker ps -a
CONTAINER ID        IMAGE               COMMAND             CREATED             STATUS                   PORTS               NAMES
8bfdba69fce3        busybox:latest      "/bin/sh"           4 hours ago         Exited (0) 4 hours ago                       stupefied_boyd
镜像加速:https://yq.aliyun.com/articles/29941
创建docker账号:https://www.docker.com/
创建后就可以拥有自己的仓库账号了, 以后自己的镜像文件都可以推送到云端,需要的时候再拉回来
私有仓库地址:https://cloud.docker.com/swarm/yourname/dashboard/onboarding/cloud-registry #将yourname换为自己的id
docker login 登录后可以push
–
–
–
 江哥架构师笔记
评论前必须登录!
注册