1、proxy_pass URL;
Context: location, if in location, limit_except
注意:proxy_pass后面的路径不带uri时,其会将location的uri传递给后端主机;
server {
    ...
    server_name HOSTNAME;
    location /uri/ {
        proxy_pass http://host[:port];
    }
    ...
}
意思:http://HOSTNAME/uri –> http://host/uri
–
proxy_pass后面的路径是一个uri时,其会将location的uri替换为proxy_pass的uri;
http://host/:后面有“/”也叫url。proxy后面有"/"的时候,将访问的url+路径全部转发给:http://host/;
server {
    ...
    server_name HOSTNAME;
    location /uri/ {
        proxy_pass http://host/;
    }
    ...
}
意思:http://HOSTNAME/uri –> http://host/
–
server {
    ...
    server_name HOSTNAME;
    location /uri/ {
        proxy_pass http://host/new_uri/;
    }
    ...
}
意思:http://HOSTNAME/uri/ –> http://host/new_uri/
–
如果location定义其uri时使用了正则表达式的模式,则proxy_pass之后必须不能使用uri;
用户请求时传递的uri将直接附加代理到的服务的之后;
server {
    ...
    server_name HOSTNAME;
    location ~|~* /uri/ {
        proxy_pass http://host;
    }
    ...
}
意思:http://HOSTNAME/uri/ –> http://host/uri/;
–
实验:
用户(192.168.175.30)通过浏览器来访问:192.168.175.11 站点,请求发送给代理服务器(nginx_server)的net1网卡(192.168.175.11),通过nginx的配置文件,将http的请求重新封装,作为客户端重新给后端的服务器发送请求,报文发送给net2,网卡(192.168.175.31),然后发送给后端的lnmp服务器lnmp_server1或者lnmp_server2,后端的主机处理接收的请求报文,将响应报文发送给net2回复给客户端,完成代理
这里的外网和内网是同一个网段,所以发送给后端的报文可以通过net1,net2发送给后端,其实一个就可以。实际中应该一个网卡是外网,一个网卡是内网,并将后端的服务器的网关指向自己内网网卡的ip。

主机:192.168.175.11

[root@localhost ~]#ifconfig
eth0      Link encap:Ethernet  HWaddr 00:50:56:3F:AC:4D
          inet addr:192.168.175.11  Bcast:192.168.175.255  Mask:255.255.255.0

eth1      Link encap:Ethernet  HWaddr 00:0C:29:E9:AD:3D
          inet addr:192.168.175.31  Bcast:192.168.175.255  Mask:255.255.255.0
–
主机:192.168.175.12

[root@localhost ~]#ifconfig
eth0      Link encap:Ethernet  HWaddr 00:50:56:39:87:7F
          inet addr:192.168.175.12  Bcast:192.168.175.255  Mask:255.255.255.0

安装nginx,设置配置文件,
[root@localhost /data/web]#cat index.html
<h1>host:12 /data/web/index.html</h1>
并且可以通过网页访问到

–
主机:192.168.175.13
和12设置相同
[root@localhost /data/web]#cat index.html
<h1>host:13 /data/web/index.html</h1>

–
下面测试最基本的的代理
主机:192.168.175.11

[root@localhost /usr/local/nginx/conf/conf.d]#cat 80.conf
server {
    listen       80 default_server;
    root /data/web;

    location / {
        proxy_pass http://192.168.175.12/;    #当location中既有root,又有proxy_pass的时候,只有proxy_pass生效,
                                              #比如配置,最后显示的是后端主机的网页
    }

    error_page 403 404 /404.html;        #!!!!!!包括这些配置都不生效,使用后面的配置

    location = /404.html {
        root /data/web/error;
     }
}

–
#验证上面的理论,proxy_pass后面的路径是一个uri时,其会将location的uri替换为proxy_pass的uri;
#对于 location /admin 下面的两个
#当proxy_pass 中有"/"的时候: proxy_pass http://192.168.175.12/; 等同于:http://192.168.175.11/admin –> http://192.168.175.12,
#当proxy_pass 没有"/"的时候: proxy_pass http://192.168.175.12; 等同于:http://192.168.175.11/admin –> http://192.168.175.12/admin
#有url(http://192.168.175.12/ 中的/单独一个/也是url),替换。没有url,将url补充到后面
#对于图片的location,正则表达式的proxy_pass后面不能加"/"。否则是错误
主机:192.168.175.11

[root@localhost /usr/local/nginx/conf/conf.d]#cat 80.conf
server {
    listen       80 default_server;
    root /data/web;

	location / {
         proxy_pass http://192.168.175.12/;
	}

	location /admin {
	      proxy_pass http://192.168.175.12/;
	}

	location ~* \.(jpg|jpeg|gif|png)$ {
	      proxy_pass http://192.168.175.13;
	}

    error_page 403 404 /404.html;

    location = /404.html {
        root /data/web/error;
    }
}
–
在主机12上面创建对应目录

[root@localhost /data/web]#cat index.html
<h1>host:12 /data/web/index.html</h1>

[root@localhost /data/web]#mkdir admin
[root@localhost /data/web]#cd admin/

[root@localhost /data/web/admin]#cat index.html
<h1>host:12 /data/web/admin/index.html</h1>
最后的显示

当proxy没有“/”的时候,结果也正确,这里不做验证了。
主机:13
复制一个图片到网站的根目录,图片也可以正常显示,代理正常
[root@localhost /data/web]#cp /usr/share/pixmaps/faces/flake.jpg .
[root@localhost /data/web]#ls
flake.jpg  index.html

查看访问日志,是代理服务器作为客户端请求后端的服务器
192.168.175.31 - - [13/Jul/2017:00:24:06 +0800] "GET /flake.jpg HTTP/1.0" 200

2、proxy_set_header field value;
http://nginx.org/en/docs/http/ngx_http_proxy_module.html#proxy_set_header
设定发往后端主机的请求报文的请求首部的值;Context: http, server, location
如果想要支持下划线的话,需要增加如下配置:underscores_in_headerson;
可以加到http或者server中
proxy_set_header X-Real-IP $remote_addr;    #这个可以在apache上面设置
proxy_set_header X-Forwarded-For $proxy_add_x_forwarded_for;    #这个可以在nginx上面设置,现成的变量
proxy_set_header bob andy;   在代理机设置此条,用户访问代理机,代理机会在报文头部添加:bob: andy 此头部,然后传送到后端
对于后端的主机,有时候要统计访问者的IP,但是因为有代理,所以后端主机的访问日志中显示的是代理服务器的IP,因此可以修改nginx配置,设定一个变量x-real-ip,变量名可以随意,然后将接收的客户端的请求中的IP地址赋值给这个变量。这样,nginx发送给后端的服务器的请求中就会有这个首部,在后端服务器的日志记录格式中将这个变量打印出来,显示的就是实际访问者的IP。
假如有二级代理:client -> proxy_2 -> proxy_1 -> server,
1前面还有2,当2发送请求给1的时候,会在http头部中设置一个header:X-Forwarded-For,然后将报文传送到后端,这样,这个头部就有用户ip地址了,只用在最前面的nginx设置添加这个头部即可
下面是示例
当访问上面的图片的时候,主机:13访问日志记录的是,代理服务器的ip地址
192.168.175.31 - - [13/Jul/2017:00:24:06 +0800] "GET /flake.jpg HTTP/1.0" 200
在代理服务器11上面配置将远程访问的ip转发到后端主机
在server配置段增加一个
#  proxy_set_header x-real_ip $remote_addr;  如果是apache,增加这个
proxy_set_header X-Forwarded-For $proxy_add_x_forwarded_for;  #因为是nginx,增加这个赋值
然后在后端服务器13上面设置日志记录将 x-real_ip 这个字段记录到日志中
#  LogFormat "%{x-real-ip}i %l %u %t \"%r\" %>s %b \"%{Referer}i\" \"%{User-Agent}i\"" combined    apache记录方式

因为nginx已经有这个变量了,
log_format  main  '$remote_addr - $remote_user [$time_local] "$request" '
                      '$status $body_bytes_sent "$http_referer" '
                      '"$http_user_agent" "$http_x_forwarded_for"';    #最后一个变量就是真实主机ip,
强制刷新远端主机访问图片,13主机日志记录,最后记录真实的主机信息,正确
192.168.175.31 - - [13/Jul/2017:00:38:13 +0800] "GET /flake.jpg HTTP/1.0" 200 4216 "----36" "192.168.175.30"
注意:如果想要将自定义的头部记录到日志文件中,需要在头部名字前加http_ 才可以
比如在配置文件中添加
proxy_set_header bob andy;

如果想要将bob头部记录到日志文件中,配置文件中日志格式要为如下才可以
log_format  main  '... "$http_bob"';

上面示例的头部也是一样的  "$http_x_forwarded_for"
如果代理机上有多个虚拟主机,分别代理到后端主机上面,则代理机上每个虚拟主机配置里面要添加Host头部,不然后端主机收到报文的Host头部为ip地址
[root@localhost /usr/local/nginx/conf/conf.d]#cat aaa.conf
#
# The default server
#

server {
    listen       80;
    server_name  abc.com;

    location / {
        proxy_pass http://192.168.170.12;
        proxy_set_header X-Forwarded-For $proxy_add_x_forwarded_for;
        proxy_set_header Host $server_name;
    }
缓存和上面的fastcgi的缓存是相似的,这个缓存是为代理服务的。
当设定缓存时,用户访问过的url和对应的内容会被缓存在nginx的磁盘中,再次请求的时候,直接从缓存中返回,不去后端服务器提取对应的内容,提高访问速度。
3、proxy_cache_path
定义可用于proxy功能的缓存;Context:	http
proxy_cache_path path [levels=levels] [use_temp_path=on|off] keys_zone=name:size [inactive=time] [max_size=size]
[manager_files=number] [manager_sleep=time] [manager_threshold=time] [loader_files=number] [loader_sleep=time]
[loader_threshold=time] [purger=on|off] [purger_files=number] [purger_sleep=time] [purger_threshold=time];
4、proxy_cache zone | off;
指明要调用的缓存,或关闭缓存机制;Context: http, server, location
5、 proxy_cache_key string;
缓存中用于“键”的内容;
默认值:proxy_cache_key $scheme$proxy_host$request_uri;
6、proxy_cache_valid [code …] time;
    定义对特定响应码的响应内容的缓存时长;

  定义在http{...}中;
  proxy_cache_path /var/cache/nginx/proxy_cache levels=1:1:1 keys_zone=pxycache:20m max_size=1g;

  定义在需要调用缓存功能的配置段,例如server{...};
  proxy_cache pxycache;
  proxy_cache_key $request_uri;
  proxy_cache_valid 200 302 301 1h;
  proxy_cache_valid any 1m;

  实验是测试缓存上面的图片,测试结果是nginx磁盘中的缓存文件大小和原始图片大小是相同的。
7、proxy_cache_use_stale
    proxy_cache_use_stale error | timeout | invalid_header | updating | http_500 | http_502 | http_503 | http_504 | http_403
    | http_404 | off ...;

  Determines in which cases a stale cached response can be used when an error occurs during communication with the proxied
  server.有可能缓存有内容但是后端的服务器挂了。当nginx向后端服务器请求,响应的是上面的状态码,使用缓存中的数据响应客户端。
8、proxy_cache_methods GET | HEAD | POST …;
 If the client request method is listed in this directive then the response will be cached. “GET” and “HEAD”
 methods are always added to the list, though it is recommended to specify them explicitly.只对哪些方法进行检查缓存,一般是get
9、proxy_hide_header field; #不想响应哪个首部信息,可以设置,context:http,server,location
By default, nginx does not pass the header fields “Date”, “Server”, “X-Pad”, and “X-Accel-...” from the response of a
proxied server to a client.
The proxy_hide_header directive sets additional fields that will not be passed.
10、proxy_connect_timeout time;
    Defines a timeout for establishing a connection with a proxied server. It should be noted that this timeout
    cannot usually exceed 75 seconds.

  默认为60s;
11、buffer相关的配置;
ngx_http_headers_module模块
The ngx_http_headers_module module allows adding the “Expires” and “Cache-Control” header fields, and arbitrary fields, to a response header.
向由代理服务器响应给客户端的响应报文添加自定义首部,或修改指定首部的值;
1、add_header name value [always];
添加自定义首部;
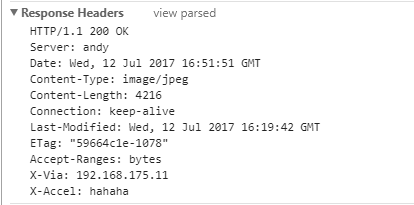
add_header X-Via $server_addr;
add_header X-Accel $server_name;

2、expires [modified] time;
expires epoch | max | off;
用于定义Expire或Cache-Control首部的值;
Nginx(5)
ngx_http_upstream_module模块
为了负载均衡,设置后端服务器组,还会对后端服务器做健康状况监测,监测到故障,会自动从可用服务器中剔除
The ngx_http_upstream_module module is used to define groups of servers that can be referenced by the proxy_pass, fastcgi_pass, uwsgi_pass, scgi_pass, and memcached_pass directives.
1、upstream name { … }
定义后端服务器组,会引入一个新的上下文;Context: http

upstream httpdsrvs {
    server ...
    server ...
    ...
}
2、server address [parameters];
  在upstream上下文中server成员,以及相关的参数;Context:	upstream

  address的表示格式:
    unix:/PATH/TO/SOME_SOCK_FILE
    IP[:PORT]
    HOSTNAME[:PORT]

  parameters:
    weight=number
      权重,默认为1;
    max_fails=number
      失败尝试最大次数;超出此处指定的次数时,server将被标记为不可用;
    fail_timeout=time
      设置将服务器标记为不可用状态的超时时长;默认10秒,和上面的次数从两个维度来检测
    max_conns
      当前的服务器的最大并发连接数;超过设定的并发数,不再给这个主机发送请求
    backup
      将服务器标记为“备用”,即所有服务器均不可用时此服务器才启用;
    down
      标记为“不可用”;当需要离线设置某台后端服务器的时候,down就可以设置
测试:
主机:11

[root@localhost /usr/local/nginx/conf/conf.d]#cat 80.conf
upstream httpsrvs {
    server 192.168.175.12;
    server 192.168.175.13;
}
server {
    listen       80 default_server;
    root /data/web;

	location / {
         proxy_pass http://httpsrvs;
	}

    error_page 403 404 /404.html;

    location = /404.html {
        root /data/web/error;
	}
}
通过轮询来进行代理访问
主机:12  13
分别设置页面,来区分不同的主机

[root@localhost ~]#curl http://192.168.175.12/admin/index.html
<h1>host:12 /data/web/admin/index.html</h1>
[root@localhost ~]#curl http://192.168.175.13/admin/index.html
<h1>host:13 /data/web/admin/index.html</h1>
然后在客户机进行访问测试,经过测试,正确
[root@localhost ~]#for i in {1..10}; do curl http://192.168.175.11/admin/index.html;done
<h1>host:13 /data/web/admin/index.html</h1>
<h1>host:12 /data/web/admin/index.html</h1>
<h1>host:12 /data/web/admin/index.html</h1>
<h1>host:13 /data/web/admin/index.html</h1>
<h1>host:12 /data/web/admin/index.html</h1>
<h1>host:13 /data/web/admin/index.html</h1>
<h1>host:12 /data/web/admin/index.html</h1>
<h1>host:13 /data/web/admin/index.html</h1>
<h1>host:12 /data/web/admin/index.html</h1>
<h1>host:13 /data/web/admin/index.html</h1>
3、least_conn;
最少连接调度算法,当server拥有不同的权重时其为wlc;
4、 ip_hash;
源地址hash调度方法;将来自于同一个ip的客户端的请求发送给同一个后端服务器
upstream httpdsrvs {
    server ...
    server ...
    ...
    ip_hash;    #这用比较粗糙,因为内网用户有时候很多,每一个IP可能有很多人,最好基于cookie来进行
}
5、hash key [consistent];
  基于指定的key的hash表来实现对请求的调度,此处的key可以直接文本、变量或二者的组合;或者是url,这样不同客户请求同一个url将发送给同一个服务器,提资源的命中率,

  作用:将请求分类,同一类请求将发往同一个upstream server;

  If the consistent parameter is specified the ketama consistent hashing method will be used instead.

  示例:
    hash $request_uri consistent;
    hash $remote_addr;	#同一个IP的用户会发送给同一个后端服务器

  最好通过hashcookie来进行绑定会话:http://nginx.org/en/docs/http/ngx_http_core_module.html#variables
  定义了很多的变量,
6、keepalive connections;
    为每个worker进程保留的空闲的长连接数量;
  nginx与后端服务器最好使用长连接,因为nginx是作为客户端来请求后端服务器的资源的,每个连接都占用一个端口,当并发连接为3万个的时候,
  意味着需要3万个端口来进行通信,非常耗费资源,使用长连接比较好,一个连接发送多次请求,
  举个例子,浏览器是nginx,淘宝和天猫是后端两个服务器,浏览器同时打开两个网站,相当于两个长连接,不管以后请求两个网站那个资源,
  都是在长连接中连续传输多个请求。只占用两个端口就可以
注意:proxy_pass方式都是用户的高位端口给代理服务器的80端口发送请求,然后代理服务器将自己作为客户端,更改请求报文的源ip为代理服务器的ip,端口为代理服务器的高位端口。目标ip为后端服务器的ip,目标端口是后端服务器的80端口,进行请求。后端服务器收到报文后,返回响应给代理服务器,代理服务器重新将报文进行封装,以代理服务器的身份返回给客户端。后端服务器的网关不用指向代理服务器,因为内网的请求都是同一网段。
具体测试看keepalived高可用nginx博文
ngx_stream_core_module模块
nginx的模块网页,有一半是介绍http的,一半是介绍stream模块的,这个模块是非常有用的,在内网中,像安全区域的服务器,都要做主从,以防一个服务器故障。那么就可以使用nginx的stream模块来代理,像dns服务,ansible服务,zabbix服务,都可以使用nginx来做冗余。使用backup模式,当主出问题的时候,备用才会起作用。
模拟反代基于tcp或udp的服务连接,即工作于传输层的反代或调度器;
http://nginx.org/en/docs/stream/ngx_stream_core_module.html
1、stream { … }
定义stream相关的服务;Context:main
stream {
    upstream sshsrvs {
        server 192.168.175.12:22;
        server 192.168.175.13:22;
        least_conn;    #最少连接调度算法,后端服务器哪个连接数少,会调度到哪个服务器中
    }

    server {
        listen 192.168.175.11:22022;
        proxy_pass sshsrvs;
    }
}
2、listen
listen address:port [ssl] [udp] [proxy_protocol] [backlog=number] [bind] [ipv6only=on|off] [reuseport] [so_keepalive=on|off|[keepidle]:[keepintvl]:[keepcnt]];
出现错误,是因为没有编译stream模块,重新编译后就可以
使用主机连接:192.168.175.11:22022的时候,实际是连接的内网的ssh
当将192.168.175.13:22注释掉后,进行nginx reload操作,当前的长链接不会中断,会继续保持,直到后端服务自己挂掉,四层协议keepalive生效
在开发之初,”环境“,”程序“和”数据“分离,就是一项基本原则。而且即使是”数据“,丢掉一台机器上的所有”数据“也不会构成问题。这应当是运维基础中的基础
–
–
–
 江哥架构师笔记
评论前必须登录!
注册