与套接字相关的配置(2)
4、tcp_nodelay on | off; #default:on,context:http,server,location
Syntax:tcp_nodelay on | off;
Default:tcp_nodelay on;
Context:http, server, location

在请求的报文很小的时候,为了节省带宽,将多个请求的响应报文合并成一个报文进行响应,但是时效性变差了。默认不会等待发送,立即发送。on的话会立即发送
在keepalived模式下的连接是否启用TCP_NODELAY选项;
5、sendfile on | off; #default:off,context:http,server,location
Syntax:	sendfile on | off;
Default:
sendfile off;
Context:	http, server, location, if in location


是否启用sendfile功能;请求直接从内核响应,不经过用户空间,非常高效
定义路径相关的配置:
6、root path;
设置web资源路径映射;用于指明用户请求的url所对应的本地文件系统上的文档所在目录路径;可用的位置:http, server, location, if in location;
7、location :文档:http://nginx.org/en/docs/http/ngx_http_core_module.html#location
location [ = | ~ | ~* | ^~ ] uri { ... }
location @name { ... }
在一个server中location配置段可存在多个,用于实现从uri到文件系统的路径映射;ngnix会根据用户请求的URI来检查定义的所有location,并找出一个最佳匹配,而后应用其配置;
=:对URI做精确匹配;例如,这两个域名
  http://andblog.cn/
  http://andblog.cn/index.html
    location = / {	#对于这个"/"只能匹配到andblog.cn/这个,另一个不能匹配。必须完全匹配,多一个字母都不行
    ...
  }

^~:对URI的左半部分做匹配检查,不区分字符大小写;表示在普通uri前要求Nginx服务器找到普通uri匹配度最高的那个location后,立即处理此请求,并不再进行正则匹配

~:对URI做正则表达式模式匹配,区分字符大小写;从上往下匹配,一旦匹配成功,则结束检查,并就会使用这个location块处理此请求

~*:对URI做正则表达式模式匹配,不区分字符大小写;从上往下匹配,一旦匹配成功,则结束检查,并就会使用这个location块处理此请求

不带符号:匹配起始于此uri的所有的url;最长匹配原则,哪个越具体匹配哪个,和location位置无关

=========================
匹配优先级从高到低:=, ^~, ~ ~*,不带符号;
下面举个例子:
location = / {
    [ configuration A ]
}

location / {    #不带符号:匹配起始于此uri的所有的url;
    [ configuration B ]
}

location /documents/ {
    [ configuration C ]
}

location ^~ /images/ {
    [ configuration D ]
}

location ~* \.(gif|jpg|jpeg)$ {
    [ configuration E ]
}
匹配优先级从高到低:=, ^~, ~ ~*,不带符号;
The “/” request will match configuration A, 因为“=”的优先级最高:

the “/index.html” request will match configuration B,不带符号:匹配起始于此uri的所有的url;
 因为C,D,E都不能匹配:http://andblog.cn/index.html

the “/documents/document.html” request will match configuration C,因为B,C都能匹配,但是C匹配的符号较长,
以匹配的符号较长的为最佳的:

the “/images/1.gif” request will match configuration D,因为B,D,E都能匹配,但是D的优先级高:

the “/documents/1.jpg” request will match configuration E.因为B,C,E都能匹配,但是E的优先级高:
8、alias path;
定义路径别名,文档映射的另一种机制;仅能用于location上下文;
注意:location中使用root指令和alias指令的意义不同;
(a) root,给定的路径对应于location中的/uri/左侧的/;
(b) alias,给定的路径对应于location中的/uri/右侧的/;
下面举例说明
[root@localhost /data]#tree .
.
└── web
    ├── admin
    │   └── index.html
    └── index.html

2 directories, 2 files
[root@localhost /data]#cat web/index.html
<h1>/data/web/index.html</h1>
[root@localhost /data]#cat web/admin/index.html
<h1>/data/web/admin/index.html</h1>


[root@localhost /usr/local/nginx/conf/conf.d]#cat 80.conf
server {
    listen       80 default_server;
    root /data/web;

    location / {
        index index.html index.htm;
    }
}
下面是正常的显示


下面是另外一个测试
文件的目录结构
[root@localhost /data]#tree .
.
├── htdoc
│   ├── admin
│   │   └── index.html
│   └── index.html
└── web
    ├── admin
    │   └── index.html
    └── index.html

4 directories, 4 files

[root@localhost /data]#cat htdoc/index.html
<h1>/data/htdoc/index.html</h1>
[root@localhost /data]#cat htdoc/admin/index.html
<h1>/data/web/htdoc/index.html</h1>
[root@localhost /data]#cat web/index.html
<h1>/data/web/index.html</h1>
[root@localhost /data]#cat web/admin/index.html
<h1>/data/web/admin/index.html</h1>


配置文件
[root@localhost /usr/local/nginx/conf/conf.d]#cat 80.conf
server {
    listen       80 default_server;
    root /data/web;

    location / {
        index index.html index.htm;
    }

    location /admin {
        root /data/htdoc;
	}
}
下面是显示结果


对于location /admin,是重新将:/data/htdoc作为根目录,去查找下面的admin目录了,
url对应的根和文件目录的对应关系
而对于“/”的location来说
  http://192.168.175.11 --> /data/web
而对于admin的location来说
  http://192.168.175.11/admin/ --> /data/htdoc
下面测试alias的含义
依旧是下面的文件目录
[root@localhost /data]#tree .
.
├── htdoc
│   ├── admin
│   │   └── index.html
│   └── index.html
└── web
    ├── admin
    │   └── index.html
    └── index.html

4 directories, 4 files
[root@localhost /data]#cat htdoc/index.html
<h1>/data/htdoc/index.html</h1>
[root@localhost /data]#cat htdoc/admin/index.html
<h1>/data/web/htdoc/index.html</h1>
[root@localhost /data]#cat web/index.html
<h1>/data/web/index.html</h1>
[root@localhost /data]#cat web/admin/index.html
<h1>/data/web/admin/index.html</h1>
下面是nginx的配置文件
[root@localhost /usr/local/nginx/conf/conf.d]#cat 80.conf
server {
    listen       80 default_server;
    root /data/web;

    location / {
        index index.html index.htm;
    }

    location /admin {
        alias /data/htdoc;
	}
}
下面是显示的结果


原理说明:对于location /admin:将url的这个路径重新定义到以下面路径为根的路径中:http://192.168.175.11/admin/ –> /web/htdoc
9、index file …;
默认资源;context:http, server, location;
10、error_page code … [=[response]] uri; #定义不同错误响应码对应不同的页面
Defines the URI that will be shown for the specified errors.
例如:定义自己的404错误页面
[root@localhost /data/web/error]#cat 404.html
<h1>/data/web/error/404.html</h1>
下面是配置文件内容
[root@localhost /usr/local/nginx/conf/conf.d]#cat 80.conf
server {
    listen       80 default_server;
    root /data/web;

    location / {
        index index.html index.htm;
    }

    error_page 404 /404.html;

    location = /404.html {
        root /data/web/error;
    }
}
下面是显示结果,当链接为不存在的页面的时候,显示自定义的页面

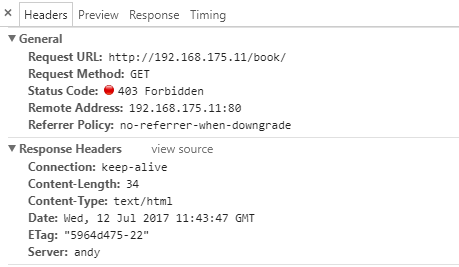
但是当目录没有权限的时候,显示403,比如创建一个book目录,显示这个目录没有权限访问。可以将所有404和403页面都定义到上面自定义的页面,这样比较安全,用户不知道这个目录是存在的没有权限,还是这个文件不存在

下面修改配置文件,配置的意思,不管是404,还是403,都显示:/404.html页面,下面的location定义这个页面的位置
[root@localhost /usr/local/nginx/conf/conf.d]#cat 80.conf
server {
    listen       80 default_server;
    root /data/web;

    location / {
        index index.html index.htm;
    }

    error_page 403 404 /404.html;

    location = /404.html {
        root /data/web/error;
    }
}

但是请求信息依然可以显示为403,禁止状态

下面可以设置不管是403还是404,页面回复的状态码都是404,然后显示:/404.html页面。
error_page 403 404 =404 /404.html;
根据官方文档:http://nginx.org/en/docs/http/ngx_http_core_module.html#error_page
下面的这些方式都可以,比如打开的页面是404,将其跳转到其他页面
error_page 403      http://example.com/forbidden.html;
error_page 404 =301 http://example.com/notfound.html;
11、try_files file … uri;
定义客户端请求的相关配置
12、keepalive_timeout timeout [header_timeout];
Syntax:keepalive_timeout timeout [header_timeout];
Default:keepalive_timeout 75s;
Context:http, server, location

设定保持连接的超时时长,0表示禁止长连接;默认为75s;
13、keepalive_requests number;
Syntax:keepalive_requests number;
Default:keepalive_requests 100;
Context:http, server, location

在一次长连接上所允许请求的资源的最大数量,默认为100;
14、keepalive_disable none | browser …;
对哪种浏览器禁用长连接;
15、send_timeout time;
Syntax:send_timeout time;
Default:send_timeout 60s;
Context:http, server, location

服务器太繁忙,但是客户端带宽太小,一个资源发送了多长时间都没有完成
向客户端发送响应报文的超时时长,此处,是指两次写操作之间的间隔时长;
16、client_body_buffer_size size;
Syntax:client_body_buffer_size size;
Default:client_body_buffer_size 8k|16k;
Context:http, server, location

用于接收客户端请求报文的body部分的缓冲区大小;默认为16k;
超出此大小时,其将被暂存到磁盘上的由client_body_temp_path指令所定义的位置;
17、client_body_temp_path path [level1 [level2 [level3]]];
设定用于存储客户端请求报文的body部分的临时存储路径及子目录结构和数量;便于检索和查看
16进制的数字;1个十六进制范围:0-F,两个十六进制范围:00-FF
client_body_temp_path /var/tmp/client_body 1 2 2	#2表示两个16进制数字来表示变化范围,1个字符
对客户端进行限制的相关配置:
18、limit_rate rate;
Syntax:limit_rate rate;
Default:limit_rate 0;
Context:http, server, location, if in location

限制响应给客户端的传输速率,单位是bytes/second,0表示无限制;
19、limit_except method … { … }
限制对指定的请求方法之外的其它方法的使用客户端;

limit_except GET {    #除了get方法之外的其他方法,只允许192.168.1网段的主机使用
  allow 192.168.1.0/32;
  deny all;
}
文件操作优化的配置
一般定义在http中,对所有的文件都生效
20、aio on | off | threads[=pool]; default:off
是否启用aio功能;建议开启,很有用
21、directio size | off; #default:off
在Linux主机启用O_DIRECT标志,此处意味文件大于等于给定的大小时使用,例如directio 4m:表示当请求的文件大于4m的时候使用directio机制,从磁盘读取数据经过内核直接发送给用户
22、open_file_cache off; default:off
open_file_cache max=N [inactive=time];
nginx可以缓存以下三种信息:
 (1) 文件的描述符、文件大小和最近一次的修改时间;
 (2) 打开的目录结构;
 (3) 没有找到的或者没有权限访问的文件的相关信息;

作用:当用户请求的文件没有权限访问,但是在缓存中记录相关的权限信息,这样不用从再次从磁盘文件查找,大大提高效率,缓存在内存中
max=N:可缓存的缓存项上限;达到上限后会使用LRU(least recently used:最近这段时间里最少使用的文件)算法实现缓存管理;
inactive=time:缓存项的非活动时长,超过时间就被移除了。在此处指定的时长内未被命中的或命中的次数少于open_file_cache_min_users指令所指定的次数的缓存项即为非活动项;
23、open_file_cache_valid time;
缓存项有效性的检查频率;默认为60s;
24、open_file_cache_min_uses number; default: 1
在open_file_cache指令的inactive参数指定的时长内,至少应该被命中多少次方可被归类为活动项;
25、open_file_cache_errors on | off; default: off
是否缓存查找时发生错误的文件一类的信息;
ngx_http_access_module模块:实现基于ip的访问控制功能
http://nginx.org/en/docs/http/ngx_http_access_module.html
26、allow address | CIDR | unix: | all;
27、deny address | CIDR | unix: | all;
http, server, location, limit_except

location / {    #识别从上往下进行判断
    deny 192.168.1.1;
    allow 192.168.1.0/24;
    allow 10.1.1.0/16;
    allow 2001:0db8::/32;
    deny all;
}
28、当nginx服务器在后端,前面是代理,用户ip在head中:x_cluster_client_ip,限制用户登录
#    location ~ ^/index.php/admin {
#        if ( $http_x_cluster_client_ip != "1.1.1.1" )
#        {
#             return 403;
#        }
#
#        root /data/web/a;
#        fastcgi_pass   127.0.0.1:9000;
#        fastcgi_split_path_info ^(.+\.php)(.*)$;
#        fastcgi_param PATH_INFO $fastcgi_path_info;
#        fastcgi_index  index.php;
#        fastcgi_param  SCRIPT_FILENAME  $document_root$fastcgi_script_name;
#        include        fastcgi_params;
#    }
ngx_http_auth_basic_module模块
实现基于用户的访问控制,使用basic机制进行用户认证;
28、auth_basic string | off;
29、auth_basic_user_file file;
location /admin/ {
    alias /webapps/app1/data/;
    auth_basic "Admin Area";
    auth_basic_user_file /etc/nginx/.ngxpasswd;
}
注意:htpasswd命令由httpd-tools的htpasswd命令所提供;
下面是示例
[root@localhost /usr/local/nginx/conf/conf.d]#cat 80.conf
server {
    listen       80 default_server;
    root /data/web;

    location / {
        index index.html index.htm;
    }

    location /admin {
        alias /data/htdoc;
        auth_basic 'input passwd';
        auth_basic_user_file /usr/local/nginx/conf/.htpasswd;
	}
}

[root@localhost /usr/local/nginx/conf]#htpasswd -c .htpasswd bob
New password:
Re-type new password:
Adding password for user bob
[root@localhost /usr/local/nginx/conf]#htpasswd .htpasswd mary
New password:
Re-type new password:
Adding password for user mary
[root@localhost /usr/local/nginx/conf]#cat .htpasswd
bob:.JDMuRyyMtMPM
mary:kzMa1w0rAQj5I
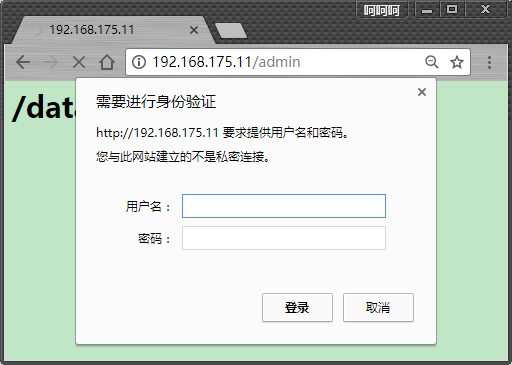
尝试访问页面

ngx_http_stub_status_module模块
用于输出nginx的基本状态信息;以后可以通过zabbix来进行监控,看其工作状态是否正常
Active connections: 291
server accepts handled requests
16630948 16630948 31070465
Reading: 6 Writing: 179 Waiting: 106

Active connections: 活动状态的连接数;
accepts:已经接受的客户端请求的总数;
handled:已经处理完成的客户端请求的总数;
requests:客户端发来的总的请求数;accepts+requests大致和总请求相同
Reading:处于读取客户端请求报文首部的连接的连接数;
Writing:处于向客户端发送响应报文过程中的连接数;
Waiting:处于等待客户端发出请求的空闲连接数;和客户端持续连接时,发送给客户端一个报文后,等待接收该客户的下一个报文


配置示例:

location /status {    #访问的路径
    stub_status;    #启用模块
    access_log off; #这样,在access_log中就不会记录访问basic_status的日志了,实验放在server中可以,但是在location中不可以
}

ngx_http_log_module模块
the ngx_http_log_module module writes request logs in the specified format.
31、log_format name string …;
string可以使用nginx核心模块及其它模块内嵌的变量;
32、access_log path [format [buffer=size] [gzip[=level]] [flush=time] [if=condition]];
access_log off;
访问日志文件路径,格式及相关的缓冲的配置;
buffer=size
flush=time #为了提高效率,日志先放置在内存的缓存中,每隔多少时间将内存缓存中的日志记录到硬盘上面
–
   log_format  main  '$remote_addr - $remote_user [$time_local] "$request" '
                      '$status $body_bytes_sent "$http_referer" '
                      '"$http_user_agent"
   log_format  abc  '$remote_addr - $remote_user [$time_local] "$request" '
                      '$status $body_bytes_sent "$http_referer" '
                      '"$http_user_agent  "$http_x_forwarded_for" "$http_x_cluster_client_ip""

   上面的意思,定义了两个log日志的记录格式,格式的名字一个叫做main,一个叫做abc,名字后面是要记录的变量,
   可以设置两个配置文件,每个配置文件单独使用一个日志记录格式,比如下面

   access_log  /data/nginx_log/a.com-access.log main;
   access_log  /data/nginx_log/a.com-access.log abc;
如果有自定义的日志格式,定义了路径后,后面要跟日志格式名字,不然不生效,自定义的日志记录不上。注意:如果想要将自定义的头部记录到日志文件中,需要在头部名字前加http_ 才可以。可看proxy部分写的
http://nginx.org/en/docs/http/ngx_http_log_module.html
33、open_log_file_cache max=N [inactive=time] [min_uses=N] [valid=time];
open_log_file_cache off;
缓存各日志文件相关的元数据信息;
max:缓存的最大文件描述符数量;
min_users:在inactive指定的时长内访问大于等于此值方可被当作活动项;
inactive:非活动时长;
valid:验正缓存中各缓存项是否为活动项的时间间隔;
–
–
 江哥架构师笔记
评论前必须登录!
注册