 江哥架构师笔记
本章主要介绍 etcd 集群的搭建方式。
介绍
上文我们简单介绍了 etcd 的基本概念和使用场景,本文就来介绍如何搭建 etcd 集群。在生产环境中,为了整个集群的高可用,etcd 正常都会以集群方式部署,避免单点故障。引导 etcd 集群的启动有以下三种机制:
-
静态
-
etcd 动态发现
-
DNS 发现
静态启动 etcd 集群要求每个成员都知道集群中的另一个成员。 在许多情况下,群集成员的 IP 可能未知,在这些情况下,可以在发现服务的帮助下引导 etcd 集群。
可以使用官方提供的工具来生成 etcd 集群的配置: http://play.etcd.io/install
这里我们将主要介绍静态方式启动 etcd 集群。
安装
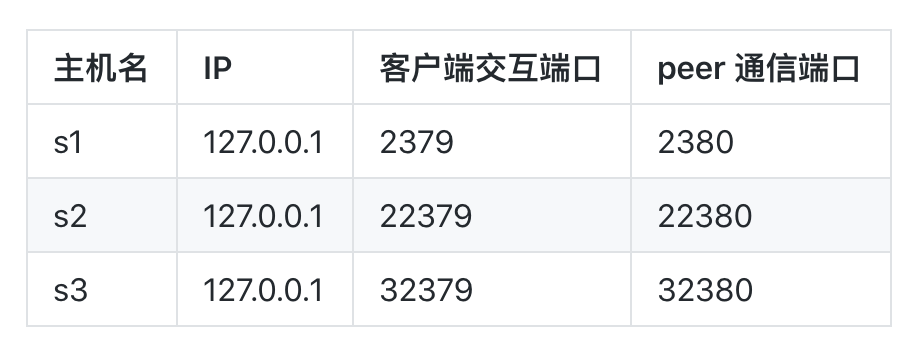
由于 etcd 是基于 raft 分布式协议的集群,所以如果要组成一个集群,集群的数量需要奇数台。如果只有一个节点的话我们也可以通过不同的端口来进行模拟,比如这里我们在一台机器上来安装一个3节点的 etcd 伪集群,对应的配置如下所示:
这里我们在一台 CentOS7 系统的节点上来进行演示,首先下载 etcd 二进制包,直接从 github release 页面下载对应的包即可:
$ wget <https://github.com/etcd-io/etcd/releases/download/v3.4.13/etcd-v3.4.13-linux-amd64.tar.gz>
$ tar -xvf etcd-v3.4.13-linux-amd64.tar.gz
$ mkdir /tmp/etcd
$ mv etcd-v3.4.13-linux-amd64/etcd /tmp/etcd/
$ mv etcd-v3.4.13-linux-amd64/etcdctl /tmp/etcd
etcd 安装完成后,启动3个不同的终端分别执行下面的3个命令来启动 etcd 集群:
# 确保 etcd 进程对数据目录具有写访问权
# 如果集群是新集群,则删除该目录;如果重新启动则保留该目录

# 启动第一个节点
$ /tmp/etcd/etcd --name s1 \\  # etcd 节点名称
  --data-dir /tmp/etcd/s1 \\  # 数据存储目录
  --listen-client-urls <http://localhost:2379> \\  # 本节点访问地址
  --advertise-client-urls <http://localhost:2379> \\  # 用于通知其他 ETCD 节点,客户端接入本节点的监听地址
  --listen-peer-urls <http://localhost:2380> \\  # 本节点与其他节点进行数据交换的监听地址
  --initial-advertise-peer-urls <http://localhost:2380> \\  # 通知其他节点与本节点进行数据交换的地址
  --initial-cluster s1=http://localhost:2380,s2=http://localhost:22380,s3=http://localhost:32380 \\  # 集群所有节点配置
  --initial-cluster-token tkn \\  # 集群唯一标识
  --initial-cluster-state new  # 节点初始化方式

# 启动第二个节点
$ /tmp/etcd/etcd --name s2 \\
  --data-dir /tmp/etcd/s2 \\
  --listen-client-urls <http://localhost:22379> \\
  --advertise-client-urls <http://localhost:22379> \\
  --listen-peer-urls <http://localhost:22380> \\
  --initial-advertise-peer-urls <http://localhost:22380> \\
  --initial-cluster s1=http://localhost:2380,s2=http://localhost:22380,s3=http://localhost:32380 \\
  --initial-cluster-token tkn \\
  --initial-cluster-state new

# 启动第三个节点
$ /tmp/etcd/etcd --name s3 \\
  --data-dir /tmp/etcd/s3 \\
  --listen-client-urls <http://localhost:32379> \\
  --advertise-client-urls <http://localhost:32379> \\
  --listen-peer-urls <http://localhost:32380> \\
  --initial-advertise-peer-urls <http://localhost:32380> \\
  --initial-cluster s1=http://localhost:2380,s2=http://localhost:22380,s3=http://localhost:32380 \\
  --initial-cluster-token tkn \\
  --initial-cluster-state new
正常启动完成后,我们可以使用 etcdctl 命令来查看集群的状态:
$ ETCDCTL_API=3 /tmp/etcd/etcdctl \\
  --endpoints localhost:2379,localhost:22379,localhost:32379 \\
  endpoint health
localhost:2379 is healthy: successfully committed proposal: took = 14.22105ms
localhost:22379 is healthy: successfully committed proposal: took = 13.058173ms
localhost:32379 is healthy: successfully committed proposal: took = 16.497453ms
$ ETCDCTL_API=3 /tmp/etcd/etcdctl \\
  --endpoints localhost:2379,localhost:22379,localhost:32379 \\
  endpoint status --write-out=table
+-----------------+------------------+---------+---------+-----------+------------+-----------+------------+--------------------+--------+
|    ENDPOINT     |        ID        | VERSION | DB SIZE | IS LEADER | IS LEARNER | RAFT TERM | RAFT INDEX | RAFT APPLIED INDEX | ERRORS |
+-----------------+------------------+---------+---------+-----------+------------+-----------+------------+--------------------+--------+
|  localhost:2379 | 7339c4e5e833c029 |  3.4.13 |   20 kB |      true |      false |        43 |          9 |                  9 |        |
| localhost:22379 | 729934363faa4a24 |  3.4.13 |   20 kB |     false |      false |        43 |          9 |                  9 |        |
| localhost:32379 |  b548c2511513015 |  3.4.13 |   20 kB |     false |      false |        43 |          9 |                  9 |        |
+-----------------+------------------+---------+---------+-----------+------------+-----------+------------+--------------------+--------+
正常可以看到3个 etcd 节点都运行成功了,也可以查看当前集群的 LEADER 节点。如果这个时候我们把 2379 端口的进程杀掉,再来查看集群的状态:
$ ETCDCTL_API=3 /tmp/etcd/etcdctl   --endpoints localhost:2379,localhost:22379,localhost:32379  endpoint status --write-out=table
{"level":"warn","ts":"2020-11-16T14:39:25.024+0800","caller":"clientv3/retry_interceptor.go:62","msg":"retrying of unary invoker failed",
"target":"passthrough:///localhost:2379","attempt":0,"error":"rpc error: code = DeadlineExceeded desc = latest balancer error:
connection error: desc = \\"transport: Error while dialing dial tcp [::1]:2379: connect: connection refused\\""}
Failed to get the status of endpoint localhost:2379 (context deadline exceeded)
+-----------------+------------------+---------+---------+-----------+------------+-----------+------------+--------------------+--------+
|    ENDPOINT     |        ID        | VERSION | DB SIZE | IS LEADER | IS LEARNER | RAFT TERM | RAFT INDEX | RAFT APPLIED INDEX | ERRORS |
+-----------------+------------------+---------+---------+-----------+------------+-----------+------------+--------------------+--------+
| localhost:22379 | 729934363faa4a24 |  3.4.13 |   20 kB |      true |      false |        44 |         10 |                 10 |        |
| localhost:32379 |  b548c2511513015 |  3.4.13 |   20 kB |     false |      false |        44 |         10 |                 10 |        |
+-----------------+------------------+---------+---------+-----------+------------+-----------+------------+--------------------+--------+
可以看到现在集群中只有两个节点,但是现在集群还是可以正常使用的,因为我们一共3个节点,现在还有超过一一半的节点正常,那么集群就是正常的,当然如果我们再关闭一个节点那么我们集群就将处于不健康的状态下了。
参数说明
上面我们成功搭建了 etcd 的集群,etcd 在启动过程中有很多参数可以配置,这里我们就先来对这些参数进行一个简单的说明。
-
--name:节点名称默认值:
default环境变量:
ETCD_NAME说明:这个值和
--initial-cluster参数中的 key 值一一对应,如果在集群环境中,name 必须是唯一的,建议用主机名称或者机器 ID。 -
--data-dir:数据存储目录默认值:
${name}.etcd环境变量:
ETCD_DATA_DIR -
--wal-dir:存放预写日志目录默认值:""
环境变量:
ETCD_WAL_DIR说明:最大的作用是记录了整个数据变化的全部历程,如果未配置则共用
--data-dir文件所在目录。 -
--snapshot-count:数据快照触发数量默认值:100000
环境变量:ETCD_SNAPSHOT_COUNT
说明:etcd 处理指定次数的事务提交后,生产数据快照
-
--heartbeat-interval: 客户端连接后的心跳间隔(毫秒)默认值:100
环境变量:ETCD_HEARTBEAT_INTERVAL
-
--election-timeout**:**集群选举的超时时间默认值:1000
环境变量:ETCD_ELECTION_TIMEOUT
-
--max-snapshots:最大快照数量,0表示不限制默认值:5
环境变量:ETCD_MAX_SNAPSHOTS
-
--max-wals:最大预写日志数量,0表示不限制默认值:5
环境变量:ETCD_MAX_WAL
-
--listen-peer-urls:本节点使用,用于监听其他节点发送信息的地址,地址写法是scheme://IP:port默认值:
http://localhost:2380环境变量:ETCD_LISTEN_PEER_URL
示例:
http://10.0.0.1:2380无效的示例:http://example.com:2380 (域名对绑定无效)
-
--listen-client-urls:本节点使用,用于 etcd 客户端通信的 url,写法是scheme://IP:port,可以多个并用逗号隔开默认值:
http://localhost:2379示例:
http://10.0.0.1:2379无效的示例:
http://example.com:2379(域名对绑定无效) -
--initial-advertise-peer-urls:其他节点通过该地址与本节点进行数据交换(选举,同步)的地址,URL 可以使用域名地址默认值:
http://localhost:2380环境变量:ETCD_INITIAL_ADVERTISE_PEER_URL
说明:与
--listener-peer-urls不同在于 listener-peer-urls 用于请求客户端的接入控制,initial-advertise-peer-urls 是告知其他集群节点访问哪个 URL,一般来说,initial-advertise-peer-urlsl 将是 listene-peer-urls 的子集。静态配置方式下,该参数值一定要同时在--initial-cluster参数中存在 -
--advertise-client-urls:用于通知其他 ETCD 节点,客户端接入本节点的监听地址,一般来说 advertise-client-urls 是 listen-client-urls 子集默认值:
http://localhost:2379环境变量:ETCD_ADVERTISE_CLIENT_URL
-
--initial-cluster:集群所有节点配置,多个用逗号隔开默认值:
http://localhost:2380环境变量:ETCD_INITIAL_CLUSTER
说明:key 是所提供的每个节点的
--name标志的值 -
--initial-cluster-state:节点初始化方式默认值:new
环境变量:ETCD_INITIAL_CLUSTER_STATE
说明:
new表示如果没有集群不存在,创建新集群,existing表示如果集群不存在,节点将处于加入集群失败状态。 -
--initial-cluster-token:集群唯一标识默认值:etcd-cluster
环境变量:ETCD_INITIAL_CLUSTER_TOKEN
说明:相同标识的节点将视为在一个集群内
在 Kubernetes 集群中部署
我们现在了解了 etcd 集群的基本搭建方式,那么我们应该如何将其运行到 Kubernetes 集群中呢?毕竟我们是要来编写 Operator 的,所以我们肯定需要先知道怎么能够在 Kubernetes 集群中运行起来。
这里我们可以使用 StatefulSet 这个控制器来运行 etcd 集群,etcd 集群的编排的资源清单文件我们可以使用 Kubernetes 源码中提供的,位于目录:test/e2e/testing-manifests/statefulset/etcd 下面。
$ ls -la test/e2e/testing-manifests/statefulset/etcd
total 40
drwxr-xr-x   6 ych  staff   192 Jun 18  2019 .
drwxr-xr-x  10 ych  staff   320 Oct 10  2018 ..
-rw-r--r--   1 ych  staff   173 Oct 10  2018 pdb.yaml
-rw-r--r--   1 ych  staff   242 Oct 10  2018 service.yaml
-rw-r--r--   1 ych  staff  6441 Jun 18  2019 statefulset.yaml
-rw-r--r--   1 ych  staff   550 Oct 10  2018 tester.yaml
其中 service.yaml 文件中就是一个用户 StatefulSet 使用的 headless service:
apiVersion: v1
kind: Service
metadata:
  name: etcd
  labels:
    app: etcd
spec:
  ports:
  - port: 2380
    name: etcd-server
  - port: 2379
    name: etcd-client
  clusterIP: None
  selector:
    app: etcd
  publishNotReadyAddresses: true
而 pdb.yaml 文件是用来保证 etcd 的高可用的一个 PodDisruptionBudget 资源对象:
apiVersion: policy/v1beta1
kind: PodDisruptionBudget
metadata:
  name: etcd-pdb
  labels:
    pdb: etcd
spec:
  minAvailable: 2
  selector:
    matchLabels:
      app: etcd
最重要的当然是 statefulset.yaml 文件,但是这个文件有很多 bug,比如在上面参数配置的时候我们就提到过 --listen-peer-urls 和 --listen-client-urls 这两个参数的值是不支持域名的绑定形式的,而这里使用的 http://${HOSTNAME}.${SET_NAME} 这个 FQDN 形式的域名,所以启动失败了,我们需要将其修改为 IP 的形式,要获取 Pod 的 IP 地址也很简单,我们可以通过 Kubernetes 提供的 Downward API 来注入一个 POD_IP 的环境变量来获取,然后将这两个参数值改成 http://${POD_IP}:PORT 即可。另外这个资源清单文件的镜像版本太老了,而且没有支持 V3 版本的 API,所以这里我们升级下镜像,让其支持 V3 版本的接口。修改过后的完整资源清单文件如下所示:
apiVersion: apps/v1
kind: StatefulSet
metadata:
  labels:
    app: etcd
  name: etcd
spec:
  replicas: 3
  selector:
    matchLabels:
      app: etcd
  serviceName: etcd
  template:
    metadata:
      labels:
        app: etcd
    spec:
      containers:
        - name: etcd
          image: cnych/etcd:v3.4.13
          imagePullPolicy: IfNotPresent
          ports:
          - containerPort: 2380
            name: peer
            protocol: TCP
          - containerPort: 2379
            name: client
            protocol: TCP
          env:
          - name: INITIAL_CLUSTER_SIZE
            value: "3"
          - name: MY_NAMESPACE
            valueFrom:
              fieldRef:
                fieldPath: metadata.namespace
          - name: POD_IP
            valueFrom:
              fieldRef:
                fieldPath: status.podIP
          - name: SET_NAME
            value: "etcd"
          command:
            - /bin/sh
            - -ec
            - |
              HOSTNAME=$(hostname)

              ETCDCTL_API=3

              eps() {
                  EPS=""
                  for i in $(seq 0 $((${INITIAL_CLUSTER_SIZE} - 1))); do
                      EPS="${EPS}${EPS:+,}<http://$>{SET_NAME}-${i}.${SET_NAME}.${MY_NAMESPACE}.svc.cluster.local:2379"
                  done
                  echo ${EPS}
              }

              member_hash() {
                  etcdctl member list | grep -w "$HOSTNAME" | awk '{ print $1}' | awk -F "," '{ print $1}'
              }

              initial_peers() {
                  PEERS=""
                  for i in $(seq 0 $((${INITIAL_CLUSTER_SIZE} - 1))); do
                    PEERS="${PEERS}${PEERS:+,}${SET_NAME}-${i}=http://${SET_NAME}-${i}.${SET_NAME}.${MY_NAMESPACE}.svc.cluster.local:2380"
                  done
                  echo ${PEERS}
              }

              # etcd-SET_ID
              SET_ID=${HOSTNAME##*-}

              # adding a new member to existing cluster (assuming all initial pods are available)
              if [ "${SET_ID}" -ge ${INITIAL_CLUSTER_SIZE} ]; then
                  # export ETCDCTL_ENDPOINTS=$(eps)
                  # member already added?

                  MEMBER_HASH=$(member_hash)
                  if [ -n "${MEMBER_HASH}" ]; then
                      # the member hash exists but for some reason etcd failed
                      # as the datadir has not be created, we can remove the member
                      # and retrieve new hash
                      echo "Remove member ${MEMBER_HASH}"
                      etcdctl --endpoints=$(eps) member remove ${MEMBER_HASH}
                  fi

                  echo "Adding new member"

                  echo "etcdctl --endpoints=$(eps) member add ${HOSTNAME}
                  --peer-urls=http://${HOSTNAME}.${SET_NAME}.${MY_NAMESPACE}.svc.cluster.local:2380"
                  etcdctl member --endpoints=$(eps) add ${HOSTNAME}
                  --peer-urls=http://${HOSTNAME}.${SET_NAME}.${MY_NAMESPACE}.svc.cluster.local:2380 | grep "^ETCD_" > /var/run/etcd/new_member_envs

                  if [ $? -ne 0 ]; then
                      echo "member add ${HOSTNAME} error."
                      rm -f /var/run/etcd/new_member_envs
                      exit 1
                  fi

                  echo "==> Loading env vars of existing cluster..."
                  sed -ie "s/^/export /" /var/run/etcd/new_member_envs
                  cat /var/run/etcd/new_member_envs
                  . /var/run/etcd/new_member_envs

                  echo "etcd --name ${HOSTNAME} --initial-advertise-peer-urls ${ETCD_INITIAL_ADVERTISE_PEER_URLS}
                  --listen-peer-urls <http://$>{POD_IP}:2380 --listen-client-urls <http://$>{POD_IP}:2379,<http://127.0.0.1:2379>
                  --advertise-client-urls <http://$>{HOSTNAME}.${SET_NAME}.${MY_NAMESPACE}.svc.cluster.local:2379
                  --data-dir /var/run/etcd/default.etcd --initial-cluster ${ETCD_INITIAL_CLUSTER} --initial-cluster-state ${ETCD_INITIAL_CLUSTER_STATE}"

                  exec etcd --listen-peer-urls <http://$>{POD_IP}:2380 \\
                      --listen-client-urls <http://$>{POD_IP}:2379,<http://127.0.0.1:2379> \\
                      --advertise-client-urls <http://$>{HOSTNAME}.${SET_NAME}.${MY_NAMESPACE}.svc.cluster.local:2379 \\
                      --data-dir /var/run/etcd/default.etcd
              fi

              for i in $(seq 0 $((${INITIAL_CLUSTER_SIZE} - 1))); do
                  while true; do
                      echo "Waiting for ${SET_NAME}-${i}.${SET_NAME}.${MY_NAMESPACE}.svc.cluster.local to come up"
                      ping -W 1 -c 1 ${SET_NAME}-${i}.${SET_NAME}.${MY_NAMESPACE}.svc.cluster.local > /dev/null && break
                      sleep 1s
                  done
              done

              echo "join member ${HOSTNAME}"
              # join member
              exec etcd --name ${HOSTNAME} \\
                  --initial-advertise-peer-urls <http://$>{HOSTNAME}.${SET_NAME}.${MY_NAMESPACE}.svc.cluster.local:2380 \\
                  --listen-peer-urls <http://$>{POD_IP}:2380 \\
                  --listen-client-urls <http://$>{POD_IP}:2379,<http://127.0.0.1:2379> \\
                  --advertise-client-urls <http://$>{HOSTNAME}.${SET_NAME}.${MY_NAMESPACE}.svc.cluster.local:2379 \\
                  --initial-cluster-token etcd-cluster-1 \\
                  --data-dir /var/run/etcd/default.etcd \\
                  --initial-cluster $(initial_peers) \\
                  --initial-cluster-state new
          lifecycle:
            preStop:
              exec:
                command:
                  - /bin/sh
                  - -ec
                  - |
                    HOSTNAME=$(hostname)

                    member_hash() {
                        etcdctl member list | grep -w "$HOSTNAME" | awk '{ print $1}' | awk -F "," '{ print $1}'
                    }

                    eps() {
                        EPS=""
                        for i in $(seq 0 $((${INITIAL_CLUSTER_SIZE} - 1))); do
                            EPS="${EPS}${EPS:+,}<http://$>{SET_NAME}-${i}.${SET_NAME}.${MY_NAMESPACE}.svc.cluster.local:2379"
                        done
                        echo ${EPS}
                    }

                    export ETCDCTL_ENDPOINTS=$(eps)
                    SET_ID=${HOSTNAME##*-}

                    # Removing member from cluster
                    if [ "${SET_ID}" -ge ${INITIAL_CLUSTER_SIZE} ]; then
                        echo "Removing ${HOSTNAME} from etcd cluster"
                        etcdctl member remove $(member_hash)
                        if [ $? -eq 0 ]; then
                            # Remove everything otherwise the cluster will no longer scale-up
                            rm -rf /var/run/etcd/*
                        fi
                    fi
          volumeMounts:
          - mountPath: /var/run/etcd
            name: datadir
  volumeClaimTemplates:
  - metadata:
      name: datadir
    spec:
      accessModes:
      - "ReadWriteOnce"
      resources:
        requests:
          # upstream recommended max is 700M
          storage: 1Gi
修改完成后,我们在 Kubernetes 集群中创建上面的几个资源对象:
➜  etcd git:(1e11e4a2108) ✗ kubectl apply -f pdb.yaml
poddisruptionbudget.policy/etcd-pdb created
➜  etcd git:(1e11e4a2108) ✗ kubectl apply -f service.yaml
service/etcd created
➜  etcd git:(1e11e4a2108) ✗ kubectl apply -f statefulset.yaml
statefulset.apps/etcd created
➜  etcd git:(1e11e4a2108) ✗ kubectl get pods -l app=etcd
NAME     READY   STATUS    RESTARTS   AGE
etcd-0   1/1     Running   0          5m35s
etcd-1   1/1     Running   0          5m12s
etcd-2   1/1     Running   0          4m51s
需要注意上面的 StatefulSet 需要3个可用的 1G 容量 ReadWriteOnce 模式的 PV
现在我们可以看到 etcd 集群就启动成功了,同样我们可以查看集群现在的状态:
➜  etcd git:(1e11e4a2108) ✗ kubectl exec -it etcd-0 /bin/sh
# etcdctl --endpoints etcd-0.etcd:2379,etcd-1.etcd:2379,etcd-2.etcd:2379 endpoint status --write-out=table
+------------------+------------------+---------+---------+-----------+------------+-----------+------------+--------------------+--------+
|     ENDPOINT     |        ID        | VERSION | DB SIZE | IS LEADER | IS LEARNER | RAFT TERM | RAFT INDEX | RAFT APPLIED INDEX | ERRORS |
+------------------+------------------+---------+---------+-----------+------------+-----------+------------+--------------------+--------+
| etcd-0.etcd:2379 | 2e80f96756a54ca9 |  3.4.13 |   20 kB |      true |      false |         2 |          9 |                  9 |        |
| etcd-1.etcd:2379 | 7fd61f3f79d97779 |  3.4.13 |   20 kB |     false |      false |         2 |          9 |                  9 |        |
| etcd-2.etcd:2379 | b429c86e3cd4e077 |  3.4.13 |   20 kB |     false |      false |         2 |          9 |                  9 |        |
+------------------+------------------+---------+---------+-----------+------------+-----------+------------+--------------------+--------+
我们可以尝试去删除其中一个 Pod 来验证集群是否正常,Pod 重建后是否还可以加入到集群中去。比如我们执行下面的命令将集群扩容到5个副本:
➜  etcd git:(1e11e4a2108) ✗ kubectl scale --replicas=5 statefulset etcd
➜  etcd git:(1e11e4a2108) ✗ kubectl get pods -l app=etcd
NAME     READY   STATUS    RESTARTS   AGE
etcd-0   1/1     Running   0          5m59s
etcd-1   1/1     Running   0          5m52s
etcd-2   1/1     Running   0          5m47s
etcd-3   1/1     Running   0          4m
etcd-4   1/1     Running   1          3m55s
此时我们再去查看集群的状态:
➜  etcd git:(1e11e4a2108) ✗ kubectl exec -it etcd-0 /bin/sh
# etcdctl --endpoints etcd-0.etcd:2379,etcd-1.etcd:2379,etcd-2.etcd:2379,etcd-3.etcd:2379,etcd-4.etcd:2379 endpoint status --write-out=table
+------------------+------------------+---------+---------+-----------+------------+-----------+------------+--------------------+--------+
|     ENDPOINT     |        ID        | VERSION | DB SIZE | IS LEADER | IS LEARNER | RAFT TERM | RAFT INDEX | RAFT APPLIED INDEX | ERRORS |
+------------------+------------------+---------+---------+-----------+------------+-----------+------------+--------------------+--------+
| etcd-0.etcd:2379 | c799a6ef06bc8c14 |  3.4.13 |   20 kB |     false |      false |        16 |         13 |                 13 |        |
| etcd-1.etcd:2379 | 9869f0647883a00d |  3.4.13 |   20 kB |      true |      false |        16 |         13 |                 13 |        |
| etcd-2.etcd:2379 | 42c8b94265b9b79a |  3.4.13 |   20 kB |     false |      false |        16 |         13 |                 13 |        |
| etcd-3.etcd:2379 | 41eec5480dc0d9ec |  3.4.13 |   20 kB |     false |      false |        16 |         13 |                 13 |        |
| etcd-4.etcd:2379 | ebbc833cba01ecad |  3.4.13 |   20 kB |     false |      false |        16 |         13 |                 13 |        |
+------------------+------------------+---------+---------+-----------+------------+-----------+------------+--------------------+--------+
当然同样也可以去对其进行缩容操作:
➜  etcd git:(1e11e4a2108) ✗ kubectl scale --replicas=3 statefulset etcd
statefulset.apps/etcd scaled
➜  etcd git:(1e11e4a2108) ✗ kubectl get pods -l app=etcd
NAME     READY   STATUS    RESTARTS   AGE
etcd-0   1/1     Running   0          11m
etcd-1   1/1     Running   0          28s
etcd-2   1/1     Running   0          23s
➜  etcd git:(1e11e4a2108) ✗ kubectl exec -it etcd-0 /bin/sh
# etcdctl --endpoints etcd-0.etcd:2379,etcd-1.etcd:2379,etcd-2.etcd:2379 endpoint status --write-out=table
+------------------+------------------+---------+---------+-----------+------------+-----------+------------+--------------------+--------+
|     ENDPOINT     |        ID        | VERSION | DB SIZE | IS LEADER | IS LEARNER | RAFT TERM | RAFT INDEX | RAFT APPLIED INDEX | ERRORS |
+------------------+------------------+---------+---------+-----------+------------+-----------+------------+--------------------+--------+
| etcd-0.etcd:2379 | 2e80f96756a54ca9 |  3.4.13 |   20 kB |      true |      false |       139 |         23 |                 23 |        |
| etcd-1.etcd:2379 | 7fd61f3f79d97779 |  3.4.13 |   20 kB |     false |      false |       139 |         23 |                 23 |        |
| etcd-2.etcd:2379 | b429c86e3cd4e077 |  3.4.13 |   20 kB |     false |      false |       139 |         23 |                 23 |        |
+------------------+------------------+---------+---------+-----------+------------+-----------+------------+--------------------+--------+
现在又变回我们的集群模式了。